
Your pages can’t rank if Google hasn’t indexed them. Google Search Console Index Coverage reports reveal exactly which URLs Google has indexed, which ones failed, and why. Understanding these reports is the difference between invisible content and organic traffic growth.
Index coverage issues silently kill SEO performance. A single misconfigured robots.txt file or redirect loop can block hundreds of valuable pages from search results.
This guide covers everything from reading coverage reports to fixing complex indexing errors, monitoring large sites, and building sustainable indexing workflows.
What Is Google Search Console Index Coverage?
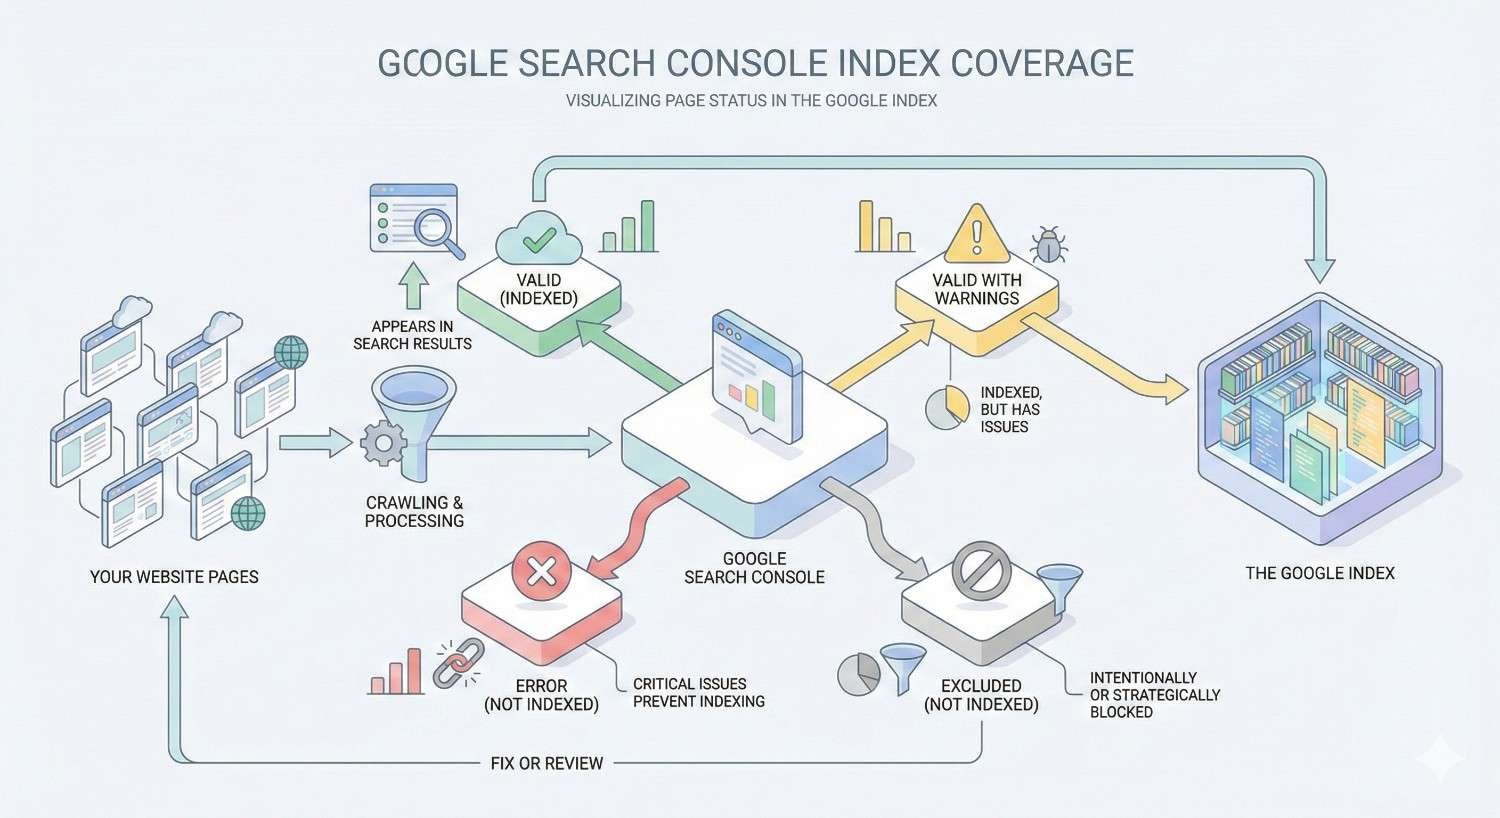
Google Search Console Index Coverage is a reporting feature that shows the indexing status of every URL Google has discovered on your website. It categorizes pages into four status types: Error, Valid with Warnings, Valid, and Excluded. These reports provide direct visibility into how Googlebot crawls, processes, and stores your content in its search index.
The Index Coverage report replaced the older Index Status feature in 2018, offering significantly more granular data about specific indexing problems. Rather than showing a simple count of indexed pages, it breaks down exactly why certain URLs succeed or fail during the indexing process.
How Index Coverage Reports Work
Google’s indexing pipeline involves multiple stages: discovery, crawling, rendering, and indexing. The Index Coverage report captures data from each stage, flagging issues that prevent successful completion.
When Googlebot discovers a URL through sitemaps, internal links, or external references, it adds that URL to its crawl queue. During crawling, Googlebot fetches the page content and analyzes server responses. The rendering stage processes JavaScript and generates the final page content. Finally, indexing determines whether the page qualifies for inclusion in search results.
Index Coverage reports aggregate this data across your entire site, updating approximately every few days. The report shows historical trends, allowing you to correlate indexing changes with site updates, migrations, or technical modifications.
Why Index Coverage Matters for Organic Visibility
Pages that aren’t indexed cannot appear in search results. Period. Even perfectly optimized content with strong backlinks generates zero organic traffic if Google hasn’t added it to the index.
Index coverage directly impacts your site’s crawl budget efficiency. When Googlebot wastes resources crawling error pages or duplicate content, fewer resources remain for your valuable pages. Large sites with thousands of URLs face particular challenges, as crawl budget limitations can delay indexing of new content by weeks or months.
Coverage issues also signal broader technical health problems. A sudden spike in server errors might indicate hosting problems. Increasing soft 404s could reveal content quality issues. Redirect errors often expose migration problems that affect user experience alongside SEO.
Where to Find Index Coverage in GSC
Access Index Coverage reports by logging into Google Search Console and selecting your verified property. In the left navigation menu, click “Indexing” then “Pages.” This opens the main coverage dashboard showing aggregate status counts and trend graphs.
The report defaults to showing all known URLs, but you can filter by sitemap submission status. Filtering to “All submitted pages” shows only URLs included in your XML sitemaps, helping identify discrepancies between what you’ve submitted and what Google has indexed.
Click any status category to drill down into specific issue types. Each issue type lists affected URLs, allowing you to investigate individual pages using the URL Inspection tool.
Understanding the Four Index Coverage Status Types
Google categorizes every discovered URL into one of four status types. Understanding these categories helps prioritize which issues require immediate attention versus routine monitoring.
Error Status: Pages Not Indexed
Error status indicates pages that Google attempted to index but failed due to technical problems. These URLs are not in Google’s index and cannot appear in search results.
Common error causes include server errors, redirect problems, blocked resources, and noindex directives on submitted URLs. Error status requires investigation and remediation, as these pages represent lost indexing opportunities.
The error count in your coverage report should ideally be zero or near-zero for submitted URLs. Any errors on pages you want indexed represent direct SEO impact requiring immediate attention.
Valid with Warnings: Indexed with Issues
Valid with Warnings indicates pages that Google successfully indexed despite detecting potential problems. These pages can appear in search results, but the warnings suggest configurations that might not match your intentions.
The most common warning involves pages indexed despite being blocked by robots.txt. This occurs when Google discovers the URL through external links but cannot crawl the content due to robots.txt restrictions. Google indexes the URL based on anchor text and surrounding context rather than actual page content.
Warning status requires review to confirm whether the current behavior matches your SEO strategy. Sometimes warnings indicate legitimate configurations; other times they reveal unintended technical issues.
Valid Status: Successfully Indexed Pages
Valid status represents the ideal outcome: pages that Google successfully crawled, rendered, and added to its search index. These URLs can appear in search results and compete for rankings.
A healthy site should show the majority of important pages in Valid status. Monitor this count over time to ensure new content gets indexed and existing pages maintain their indexed status.
Valid pages aren’t guaranteed to rank well or receive traffic. Indexation is a prerequisite for rankings, not a guarantee. However, without Valid status, ranking is impossible.
Excluded Status: Intentionally Not Indexed
Excluded status covers URLs that Google discovered but chose not to index. This category includes both intentional exclusions (pages you’ve marked as noindex) and Google’s algorithmic decisions to skip certain content.
Not all excluded pages represent problems. Duplicate content properly canonicalized to a primary URL should appear as excluded. Paginated archives, filtered product listings, and utility pages often belong in excluded status.
Review excluded pages periodically to ensure important content hasn’t been incorrectly categorized. A page you want indexed appearing as “Crawled – currently not indexed” indicates Google found the content but deemed it insufficient quality for indexing.
Common Index Coverage Errors and What They Mean
Each error type in the Index Coverage report indicates a specific technical problem preventing indexation. Understanding these errors enables targeted troubleshooting.
Server Error (5xx)
Server errors occur when Googlebot receives a 5xx HTTP status code instead of page content. These errors indicate your server failed to process the request, returning errors like 500 Internal Server Error, 502 Bad Gateway, or 503 Service Unavailable.
Intermittent server errors during high-traffic periods or maintenance windows may resolve automatically. Persistent server errors suggest hosting problems, application bugs, or resource limitations requiring technical intervention.
Check your server logs for the specific error codes and timestamps. Compare these with Googlebot’s crawl attempts visible in the coverage report. If errors correlate with traffic spikes, consider upgrading hosting resources or implementing caching.
Redirect Error
Redirect errors indicate problems with your URL redirection configuration. Common causes include redirect loops (URL A redirects to URL B, which redirects back to URL A), redirect chains exceeding Google’s limit, or redirects pointing to non-existent destinations.
Google follows a limited number of redirects before abandoning the crawl. Chains longer than five hops often trigger redirect errors. Each redirect also adds latency, degrading user experience alongside crawl efficiency.
Audit redirect configurations using crawling tools like Screaming Frog. Map the complete redirect path for affected URLs and simplify chains to single-hop redirects pointing directly to final destinations.
Submitted URL Not Found (404)
This error appears when URLs included in your XML sitemap return 404 Not Found responses. Google expects sitemap URLs to return valid content, so 404s on submitted URLs indicate sitemap maintenance problems.
Common causes include deleted pages still listed in sitemaps, URL structure changes without sitemap updates, or typos in sitemap generation. The fix involves either restoring the missing content, implementing redirects to relevant pages, or removing the URLs from your sitemap.
Maintain sitemap hygiene by regenerating sitemaps after content deletions or URL changes. Automated sitemap generation through CMS plugins typically handles this automatically, but manual sitemaps require regular audits.
Submitted URL Blocked by robots.txt
This error occurs when your sitemap includes URLs that your robots.txt file blocks from crawling. The contradiction signals a configuration problem: you’re telling Google to index pages while simultaneously blocking access to them.
Resolve this by either removing the URLs from your sitemap (if blocking is intentional) or updating robots.txt to allow crawling (if indexing is desired). Submitting blocked URLs wastes crawl budget and creates confusing signals for search engines.
Review your robots.txt rules carefully, as overly broad patterns can accidentally block important content. Test specific URLs using Google’s robots.txt tester in Search Console.
Submitted URL Marked ‘noindex’
This error indicates URLs in your sitemap that contain noindex meta tags or X-Robots-Tag headers. Like the robots.txt conflict, this represents contradictory instructions: the sitemap requests indexing while the page itself refuses it.
Determine whether the noindex directive is intentional. If so, remove the URL from your sitemap. If the page should be indexed, remove the noindex tag from the page’s HTML or HTTP headers.
CMS plugins sometimes add noindex tags to certain page types by default. Check your SEO plugin settings if multiple pages show this error unexpectedly.
Soft 404 Error
Soft 404 errors occur when a page returns a 200 OK status code but displays content that Google interprets as an error page. This typically happens with empty pages, pages showing “no results found” messages, or thin content that provides no value.
Google’s algorithms detect soft 404s to prevent indexing pages that would disappoint users. Common triggers include empty category pages, search results pages with no matches, or product pages for out-of-stock items showing minimal content.
Fix soft 404s by either adding substantial content to the pages, returning proper 404 status codes, or implementing redirects to relevant alternatives. For e-commerce sites, consider showing related products on out-of-stock pages rather than empty states.
Page with Redirect
This status indicates that a submitted URL redirects to a different destination. While redirects themselves aren’t errors, submitting redirecting URLs in sitemaps is inefficient.
Update your sitemap to include only final destination URLs, not URLs that redirect. This improves crawl efficiency and provides cleaner signals to Google about your site’s URL structure.
After site migrations or URL restructuring, regenerate sitemaps to reflect the new URL patterns rather than maintaining redirects from old URLs.
Crawled – Currently Not Indexed
This status indicates Google successfully crawled the page but chose not to add it to the index. Unlike errors, this represents an algorithmic decision rather than a technical failure.
Common reasons include thin content, duplicate content without proper canonicalization, low-quality pages, or content Google deems insufficiently valuable for its index. This status often affects pages with minimal unique content, auto-generated pages, or content that closely duplicates other indexed pages.
Improving content quality, adding unique value, and ensuring proper internal linking can help these pages achieve indexed status. However, some pages may legitimately not warrant indexing, and forcing indexation of low-quality content can harm overall site quality signals.
How to Read and Interpret Your Index Coverage Report
Effective use of Index Coverage reports requires understanding the dashboard layout, trend analysis, and filtering capabilities.
Analyzing the Coverage Summary Dashboard
The main dashboard displays four colored bars representing each status type: Error (red), Valid with Warnings (yellow), Valid (green), and Excluded (gray). The numbers show current counts for each category.
Below the summary, a trend graph shows how these counts have changed over time. The default view shows 90 days of data, but you can adjust the date range for longer historical analysis.
Focus first on the Error count. Any non-zero error count on pages you want indexed requires investigation. Then review Valid with Warnings to ensure those pages are behaving as intended. Finally, spot-check Excluded pages to confirm important content hasn’t been incorrectly categorized.
Understanding Coverage Trends Over Time
Trend analysis reveals patterns that point counts alone might miss. A gradual increase in errors could indicate accumulating technical debt. A sudden spike often correlates with specific events like deployments, migrations, or server issues.
Correlate coverage changes with your deployment calendar. If errors spike after a release, the deployment likely introduced problems. If Valid counts drop without corresponding error increases, pages may have shifted to Excluded status.
Seasonal patterns can also appear in coverage data. E-commerce sites might see increased soft 404s after holiday seasons when temporary product pages expire. Content sites might see excluded page increases as older content becomes less relevant.
Filtering and Segmenting Coverage Data
Use the sitemap filter to compare submitted versus discovered URLs. Filtering to “All submitted pages” shows only URLs you’ve explicitly requested indexing for through sitemaps. This view helps identify gaps between your indexing intentions and actual results.
Click into specific issue types to see affected URL lists. The detail view shows up to 1,000 example URLs for each issue type. For sites with more affected URLs, the examples represent a sample rather than the complete list.
Use the URL Inspection tool on specific examples to get detailed diagnostic information. This reveals exactly what Google saw when crawling the page, including HTTP responses, detected canonical URLs, and indexing decisions.
Identifying Priority Issues by Impact
Not all coverage issues deserve equal attention. Prioritize based on page importance and issue severity.
Errors on high-value pages (product pages, service pages, key landing pages) require immediate attention. Errors on low-value pages (old blog posts, utility pages) can be addressed during routine maintenance.
Consider the scale of each issue type. An error affecting 500 pages demands more urgency than one affecting 5 pages. However, 5 errors on your highest-traffic pages might matter more than 500 errors on pages that never received traffic anyway.
Use Google Analytics or your analytics platform to identify which affected URLs historically drove traffic or conversions. Prioritize restoring indexation for pages with proven performance.
Step-by-Step: How to Fix Index Coverage Errors
Systematic troubleshooting resolves most coverage errors efficiently. Follow this diagnostic and remediation workflow.
Diagnosing the Root Cause of Indexing Issues
Start by identifying the specific error type in the coverage report. Click the error category to see affected URLs, then use the URL Inspection tool on representative examples.
The URL Inspection tool shows Google’s last crawl attempt, including the HTTP response code, detected robots.txt rules, canonical URL, and indexing status. Compare this information against your intended configuration.
For server errors, check your server logs for corresponding error entries. For redirect errors, trace the complete redirect chain. For blocking issues, review robots.txt and meta robots configurations.
Document your findings before making changes. Understanding the root cause prevents fixing symptoms while leaving underlying problems unresolved.
Fixing Server and Technical Errors
Server errors require coordination with your hosting provider or development team. Common fixes include:
Increasing server resources to handle Googlebot’s crawl rate. Googlebot can crawl aggressively, and underpowered servers may fail under load.
Fixing application bugs that cause 500 errors on specific URL patterns. Review error logs to identify which code paths trigger failures.
Implementing proper error handling so temporary issues return 503 Service Unavailable with Retry-After headers rather than 500 errors.
Configuring CDN and caching layers to serve cached content when origin servers experience problems.
After implementing fixes, monitor the coverage report for error count decreases. Server error resolution typically reflects in reports within one to two weeks.
Resolving robots.txt and Crawl Blocking Issues
Review your robots.txt file for overly broad blocking rules. Common mistakes include blocking entire directories that contain important content or using wildcards that match unintended URL patterns.
Test specific URLs using the robots.txt tester in Search Console. This tool shows exactly which rules affect each URL and whether crawling is allowed or blocked.
If blocking is unintentional, update robots.txt to allow crawling. If blocking is intentional but the URLs appear in your sitemap, remove them from the sitemap instead.
Remember that robots.txt changes take effect immediately for new crawls, but Google may take time to recrawl previously blocked URLs.
Correcting Redirect and 404 Errors
For redirect errors, map the complete redirect path using a tool like Screaming Frog or browser developer tools. Identify loops, excessive chains, or broken destinations.
Simplify redirect chains to single hops pointing directly to final destinations. Update any internal links pointing to redirecting URLs to point to final destinations instead.
For 404 errors on submitted URLs, determine whether the content should exist. If yes, restore it or fix the URL. If the content was intentionally removed, implement a redirect to a relevant alternative or remove the URL from your sitemap.
Maintain a redirect map documenting all redirects, their purposes, and implementation dates. This documentation proves invaluable during future troubleshooting.
Addressing ‘noindex’ and Meta Tag Issues
Locate the source of noindex directives. Check the page’s HTML for meta robots tags and HTTP headers for X-Robots-Tag values.
Common sources of unintended noindex tags include:
CMS settings that apply noindex to certain page types by default. Review your CMS and SEO plugin configurations.
Staging environment settings accidentally deployed to production. Ensure deployment processes don’t carry over development configurations.
Conditional logic that applies noindex based on content characteristics. Review any dynamic noindex rules in your templates.
After removing unintended noindex directives, request reindexing through the URL Inspection tool to accelerate Google’s recognition of the change.
Requesting Re-indexing After Fixes
After resolving coverage errors, use the URL Inspection tool to request indexing for affected pages. Enter the URL, wait for the live test to complete, then click “Request Indexing.”
Google limits indexing requests to prevent abuse, so prioritize your most important pages. For large-scale fixes affecting many URLs, rely on natural recrawling rather than manual requests.
Submit an updated sitemap after major fixes to signal that your site has changed. This can accelerate Google’s discovery and recrawling of fixed pages.
Monitor the coverage report over the following weeks to confirm error counts decrease. Resolution typically appears within one to four weeks depending on your site’s crawl frequency.
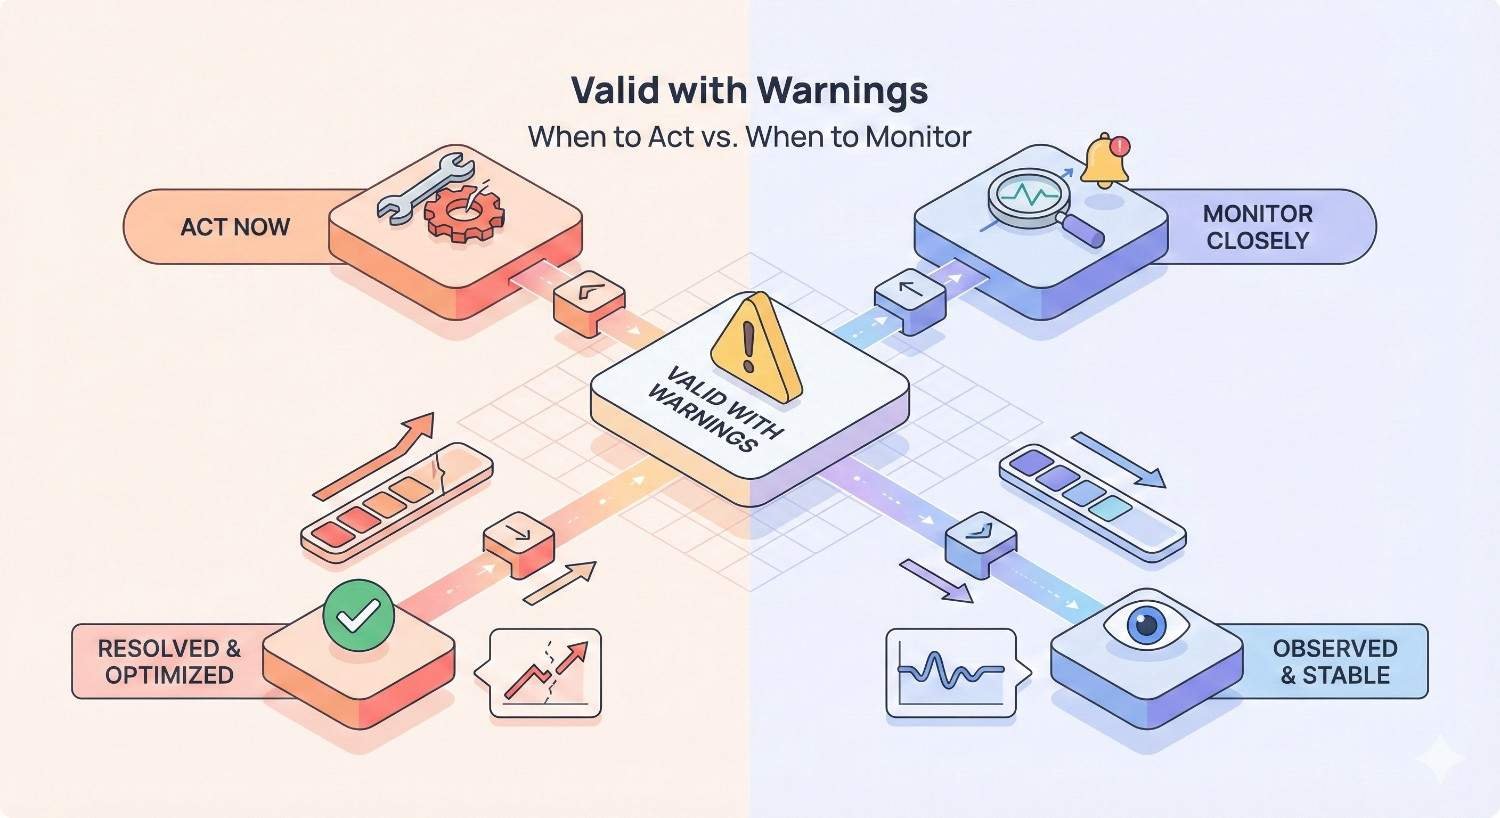
Valid with Warnings: When to Act vs. When to Monitor
Warning status requires judgment calls. Some warnings indicate problems; others reflect intentional configurations.
Indexed Though Blocked by robots.txt
This warning appears when Google indexes a URL based on external signals despite being unable to crawl the content due to robots.txt blocking.
Google discovers these URLs through external links pointing to them. Without access to the actual content, Google creates an index entry based on anchor text and surrounding context from linking pages.
If you want the page indexed with its actual content, update robots.txt to allow crawling. If you don’t want the page indexed at all, add a noindex meta tag (which requires allowing crawling so Google can see the tag) or use the URL Removal tool for temporary removal.
This warning often appears on pages blocked for historical reasons that no longer apply. Review whether the blocking rule still serves its original purpose.
Indexed Without Content (Thin Pages)
This warning indicates pages Google indexed but flagged as having minimal content. While indexed, these pages may not rank well and could contribute to site-wide quality concerns if numerous.
Evaluate whether the pages should have more content. Product pages, category pages, and informational pages typically need substantial content to provide value. Utility pages like contact forms or login pages may legitimately have minimal content.
For pages that should have more content, develop a content enhancement plan. For pages that legitimately have minimal content, consider whether they need to be indexed at all. Applying noindex to low-value pages can improve overall site quality signals.
Understanding Excluded Pages (And When It’s Normal)
Excluded status encompasses many different reasons for non-indexation. Some are problems; many are expected behavior.
Crawled – Currently Not Indexed
Google crawled the page but chose not to index it. This algorithmic decision typically reflects quality or uniqueness concerns.
Pages in this status often have thin content, duplicate content issues, or content Google deems insufficiently valuable. The page isn’t technically broken, but Google doesn’t consider it index-worthy.
Improving these pages requires adding unique value. Expand thin content, differentiate from similar pages, improve internal linking to signal importance, and ensure the content serves a clear user need.
Some pages may never achieve indexed status despite improvements. Google’s index has finite capacity, and not every page on the internet warrants inclusion.
Discovered – Currently Not Indexed
Google knows about the URL but hasn’t crawled it yet. This status indicates the page is in Google’s crawl queue awaiting processing.
New pages commonly appear in this status before their first crawl. Pages on sites with limited crawl budget may remain in this status longer as Google prioritizes other URLs.
Improve crawl priority by strengthening internal linking to important pages, submitting URLs through sitemaps, and ensuring your site’s overall crawl efficiency. Reducing errors and removing low-value pages from crawl paths frees budget for pages awaiting crawling.
Duplicate Content Exclusions
Several excluded statuses relate to duplicate content handling:
“Duplicate without user-selected canonical” means Google found duplicate content and chose which version to index without explicit canonical guidance from you.
“Duplicate, Google chose different canonical than user” means your canonical tag points to one URL, but Google determined a different URL is the better canonical.
These statuses often appear on URL variations (with/without trailing slashes, HTTP/HTTPS versions, www/non-www versions) or legitimately duplicate pages like print versions.
Review canonical tag implementation if Google consistently overrides your selections. Ensure canonical tags point to the correct preferred versions and that those versions are accessible and high-quality.
Alternate Page with Proper Canonical Tag
This status indicates pages correctly canonicalized to a different URL. The alternate page won’t be indexed because you’ve told Google to index the canonical version instead.
This is expected behavior for intentional duplicates. Product pages with color variations canonicalized to a main product page, paginated content canonicalized to page one, or regional variations canonicalized to a primary version all correctly appear in this status.
No action needed unless pages appear here incorrectly. If a page you want indexed shows this status, check for unintended canonical tags pointing elsewhere.
Page Removed or Soft 404
This status covers pages Google previously indexed but removed due to 404 responses or soft 404 detection. The page existed in the index but no longer qualifies.
For intentionally removed content, this status is correct. For content that should still exist, investigate why Google sees it as removed. Check for accidental deletions, URL changes, or content changes that triggered soft 404 detection.
Blocked by robots.txt (Intentional)
Pages blocked by robots.txt that aren’t submitted in sitemaps appear here. Unlike the error status for submitted-but-blocked URLs, this represents expected behavior for pages you’ve chosen to block.
Review periodically to ensure blocking rules still match your intentions. Sites accumulate robots.txt rules over time, and some may become obsolete as site structure evolves.
How to Submit URLs for Indexing Using GSC
Google Search Console provides multiple methods for requesting indexation of new or updated content.
Using the URL Inspection Tool
The URL Inspection tool provides detailed information about any URL’s indexing status and allows indexing requests.
Enter a URL in the inspection bar at the top of Search Console. Google displays the current index status, last crawl date, and any detected issues. Click “Test Live URL” to see what Google would find if it crawled the page right now.
The live test reveals current page content, HTTP responses, detected resources, and any rendering issues. Compare live results against the indexed version to identify discrepancies.
Requesting Indexing for Individual Pages
After inspecting a URL, click “Request Indexing” to add the page to Google’s priority crawl queue. This accelerates indexing for new pages or prompts recrawling of updated content.
Google limits indexing requests to prevent abuse. Use requests strategically for your most important pages rather than bulk-requesting every URL.
Requesting indexing doesn’t guarantee indexation. Google still evaluates whether the page meets quality thresholds. However, it does ensure Google crawls the page promptly rather than waiting for natural discovery.
Submitting Sitemaps for Bulk Indexing
XML sitemaps communicate your full URL inventory to Google. Submit sitemaps through the Sitemaps section of Search Console.
Enter your sitemap URL and click Submit. Google fetches the sitemap and begins processing the listed URLs. The sitemaps report shows submission status, last read date, and counts of discovered versus indexed URLs.
For large sites, use sitemap index files that reference multiple individual sitemaps. This organization helps manage URL limits (50,000 URLs per sitemap) and enables segmentation by content type or site section.
Update sitemaps whenever you add, remove, or significantly modify content. Dynamic sitemap generation through CMS plugins automates this process for most sites.
How Long Does Indexing Take?
Indexing timeframes vary based on site authority, crawl frequency, and content type. New pages on established sites with frequent crawling often index within hours to days. New sites or pages with limited internal linking may take weeks.
Factors affecting indexing speed include:
Site crawl frequency: Sites Google crawls frequently see faster indexing of new content.
Internal linking: Pages with strong internal links get discovered and crawled faster.
Content quality: High-quality, unique content indexes more reliably than thin or duplicate content.
Server performance: Fast, reliable servers enable efficient crawling.
Sitemap submission: Submitted URLs get prioritized over URLs discovered only through crawling.
Monitor the coverage report and URL Inspection tool to track indexing progress. If pages remain unindexed after several weeks despite no errors, investigate potential quality or technical issues.
Monitoring Index Coverage for Large Websites
Sites with thousands or millions of URLs require systematic monitoring approaches beyond manual review.
Setting Up Coverage Alerts and Notifications
Google Search Console sends email notifications when it detects significant coverage issues. Ensure notifications are enabled in your Search Console settings.
Configure notification preferences to receive alerts for:
Coverage issues: Spikes in errors or warnings Security issues: Detected malware or hacking Manual actions: Penalties requiring attention
Email alerts provide early warning of problems, but don’t rely on them exclusively. Google’s detection thresholds may miss gradual degradation that manual monitoring would catch.
Tracking Indexation Rates Over Time
Calculate your indexation rate by dividing Valid pages by total submitted pages. Track this metric weekly or monthly to identify trends.
A healthy site typically maintains indexation rates above 90% for submitted URLs. Rates below 80% suggest systematic issues requiring investigation.
Create a simple tracking spreadsheet recording:
Date Total submitted URLs Valid count Error count Excluded count Indexation rate percentage
Trend this data over time to spot gradual changes that might not trigger alerts.
Segmenting Coverage by Site Section or Template
Large sites benefit from segmented analysis. Create separate sitemaps for different content types or site sections, then analyze coverage for each segment independently.
For example, an e-commerce site might create separate sitemaps for:
Product pages Category pages Blog content Informational pages
This segmentation reveals whether issues affect specific content types. A spike in soft 404s limited to product pages suggests inventory or template issues rather than site-wide problems.
Use the sitemap filter in coverage reports to analyze each segment. Compare indexation rates across segments to identify underperforming areas.
Using the GSC API for Automated Monitoring
The Google Search Console API enables programmatic access to coverage data. Use the API to build automated monitoring dashboards and alerting systems.
The Search Analytics API provides query and page performance data. The URL Inspection API allows programmatic inspection of individual URLs. The Sitemaps API manages sitemap submissions.
Common API use cases include:
Daily exports of coverage metrics to data warehouses Automated alerts when error counts exceed thresholds Integration with SEO platforms for unified reporting Bulk URL inspection for large-scale audits
API access requires OAuth authentication and respects rate limits. Plan your implementation to stay within quota constraints.
Index Coverage vs. URL Inspection Tool: What’s the Difference?
These two Search Console features serve complementary purposes. Understanding when to use each improves diagnostic efficiency.
When to Use Index Coverage Reports
Use Index Coverage reports for:
Site-wide health monitoring: Understanding overall indexation status across your entire site.
Trend analysis: Identifying changes over time that correlate with site updates or external factors.
Issue discovery: Finding problems you didn’t know existed by reviewing error and warning categories.
Prioritization: Determining which issue types affect the most URLs and warrant attention.
Coverage reports provide aggregate views ideal for monitoring and strategic planning. They answer questions like “How many pages are indexed?” and “What types of problems exist?”
When to Use URL Inspection Tool
Use the URL Inspection tool for:
Individual page diagnosis: Understanding why a specific URL is or isn’t indexed.
Live testing: Seeing what Google would find if it crawled a page right now.
Indexing requests: Prompting Google to crawl and index specific pages.
Troubleshooting: Investigating specific errors identified in coverage reports.
The URL Inspection tool provides granular detail for tactical troubleshooting. It answers questions like “Why isn’t this specific page indexed?” and “What does Google see when it crawls this URL?”
Use coverage reports to identify problems, then use URL Inspection to diagnose and resolve specific instances.
How Index Coverage Impacts SEO Performance
Index coverage directly affects your site’s ability to generate organic traffic. Understanding this relationship helps prioritize technical SEO investments.
The Relationship Between Indexation and Rankings
Indexation is a prerequisite for rankings, not a guarantee. A page must be indexed to appear in search results, but indexed pages still compete based on relevance, quality, and authority signals.
Think of indexation as qualifying for the race. Your page can’t win if it’s not entered. But entry alone doesn’t determine finishing position.
Pages with coverage errors have zero chance of ranking for any query. Pages that are indexed compete based on traditional ranking factors. Fixing coverage errors removes barriers; improving content and authority improves competitive position.
How Coverage Issues Affect Organic Traffic
Coverage issues impact traffic through multiple mechanisms:
Direct traffic loss: Pages with errors can’t rank, eliminating potential traffic from queries those pages would have served.
Crawl budget waste: Errors consume crawl resources that could be spent on valuable pages, potentially delaying indexation of new content.
Quality signals: High error rates may signal site quality problems to Google’s algorithms, potentially affecting site-wide rankings.
User experience correlation: Many coverage errors (server errors, redirect problems) also affect real users, creating negative engagement signals.
Quantify the impact by identifying which error-affected pages previously drove traffic. Historical analytics data reveals the traffic value at risk from coverage problems.
Measuring the ROI of Fixing Index Coverage Errors
Calculate the return on technical SEO investments by tracking traffic recovery after fixes.
Before fixing, document:
Affected URLs and their historical traffic Current error counts by type Estimated fix effort and cost
After fixing, measure:
Error count reduction Traffic recovery on previously affected pages Time to recovery
Compare traffic gains against fix costs to calculate ROI. A fix costing 10 hours of developer time that recovers 1,000 monthly visits has clear positive ROI for most businesses.
Track these metrics over time to build a business case for ongoing technical SEO investment. Demonstrating measurable returns justifies continued attention to coverage health.
Best Practices for Maintaining Healthy Index Coverage
Proactive maintenance prevents coverage problems from accumulating. Establish systematic practices for ongoing health.
Regular Coverage Audits and Monitoring Schedules
Establish a regular review cadence based on site size and change frequency:
Small sites (under 1,000 pages): Monthly coverage review Medium sites (1,000-50,000 pages): Weekly coverage review Large sites (50,000+ pages): Daily automated monitoring with weekly manual review
During each review:
Check error counts and investigate any increases Review warning status for unexpected entries Spot-check excluded pages for incorrectly categorized content Compare current metrics against historical baselines
Document findings and track issue resolution over time.
Proactive Technical SEO Maintenance
Prevent coverage issues through proactive maintenance:
Pre-deployment testing: Check staging environments for coverage issues before production releases.
Redirect management: Maintain redirect maps and audit chains regularly.
Robots.txt review: Periodically verify blocking rules match current intentions.
Canonical audits: Ensure canonical tags point to correct preferred versions.
Server monitoring: Track server performance and error rates continuously.
Build these checks into your development and deployment workflows rather than treating them as separate SEO tasks.
Sitemap Optimization and Submission Strategy
Maintain clean, accurate sitemaps:
Include only indexable URLs: No redirects, no blocked pages, no noindex pages.
Update promptly: Regenerate sitemaps after content changes.
Use lastmod accurately: Only update lastmod when content actually changes.
Segment large sites: Use multiple sitemaps organized by content type.
Monitor sitemap reports: Check for submission errors and coverage discrepancies.
Automated sitemap generation through CMS plugins handles most maintenance automatically. Verify plugin configurations match your indexing intentions.
Managing Crawl Budget for Large Sites
Large sites must optimize crawl budget allocation:
Prioritize important pages: Ensure valuable content has strong internal linking.
Reduce crawl waste: Block or noindex low-value pages that consume crawl resources.
Fix errors promptly: Errors waste crawl budget on failed requests.
Optimize server performance: Faster responses enable more efficient crawling.
Use crawl rate settings: Adjust Search Console crawl rate if server capacity is limited.
Monitor crawl stats in Search Console to understand how Google allocates crawl resources across your site.
Documentation and Change Tracking
Maintain documentation supporting coverage management:
URL structure documentation: How URLs are constructed and what patterns exist.
Redirect inventory: All redirects, their purposes, and implementation dates.
Robots.txt history: Changes over time and reasons for each rule.
Coverage baselines: Historical metrics for comparison.
Issue resolution log: Problems found, fixes implemented, and outcomes.
This documentation accelerates troubleshooting and prevents repeating past mistakes.
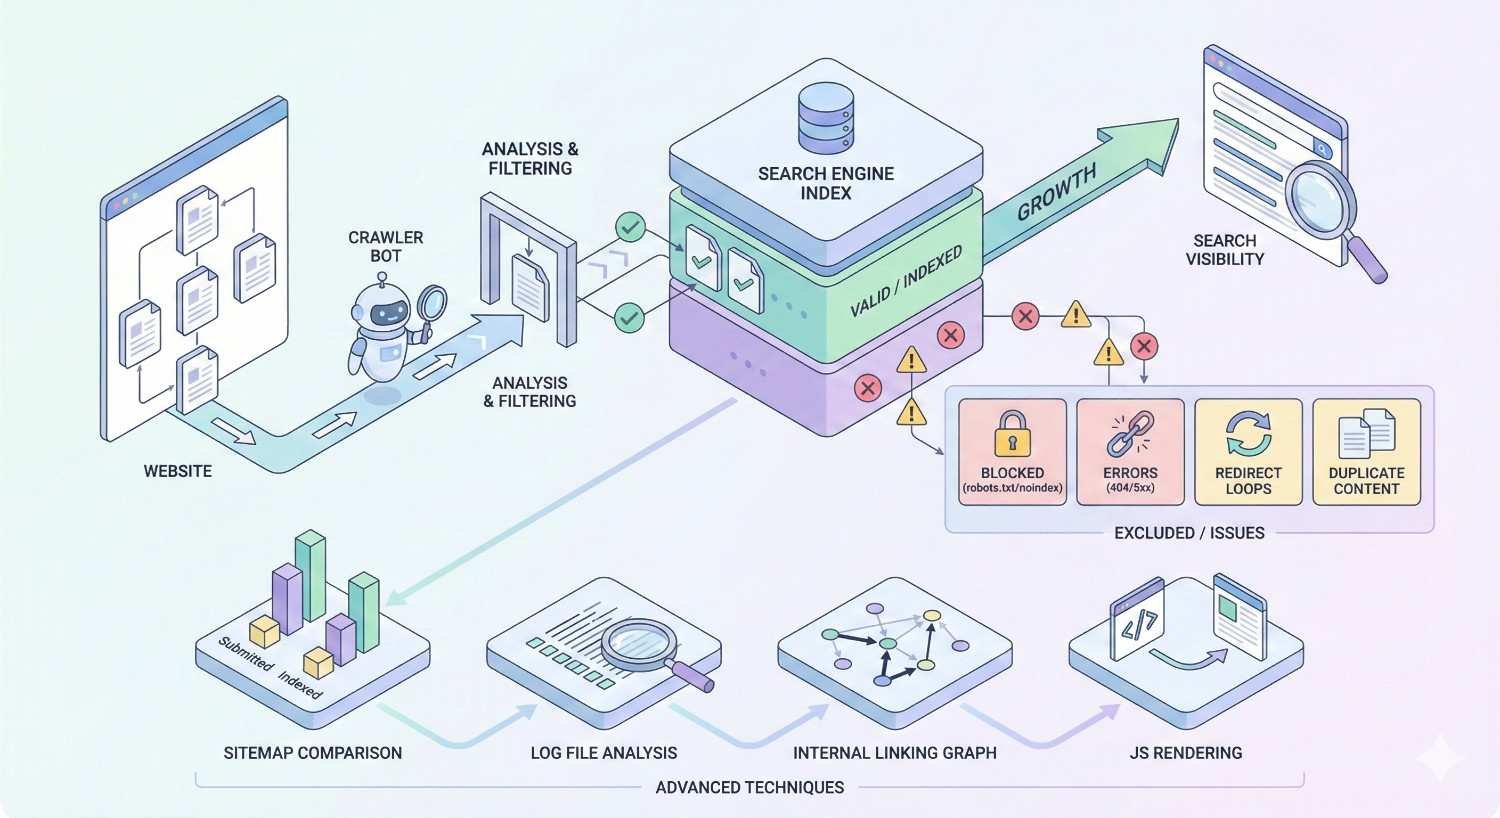
Advanced Index Coverage Analysis Techniques
Sophisticated analysis techniques extract deeper insights from coverage data.
Exporting and Analyzing Coverage Data in Spreadsheets
Export affected URL lists from coverage reports for detailed analysis. Click any issue type, then use the export button to download URL lists.
In spreadsheets, analyze patterns:
URL structure patterns: Do errors cluster on specific URL patterns or directories?
Template correlation: Do issues affect specific page templates?
Content characteristics: Do affected pages share content attributes?
Temporal patterns: When were affected pages created or modified?
Pattern identification guides systematic fixes rather than page-by-page remediation.
Combining Coverage Data with Analytics and Ranking Data
Merge coverage data with other data sources for comprehensive analysis:
Analytics integration: Match coverage status against traffic data to quantify impact.
Ranking data: Compare indexed pages against ranking positions to identify indexation-ranking correlations.
Crawl data: Cross-reference coverage with crawl tool findings to validate issues.
Log file data: Correlate coverage status with actual Googlebot crawl behavior.
This combined analysis reveals insights invisible in any single data source.
Using Log File Analysis to Validate Coverage Issues
Server log files record actual Googlebot visits, providing ground truth for coverage analysis.
Compare log file data against coverage reports:
Are pages marked as errors actually receiving crawl attempts? How frequently does Googlebot visit different page types? Do server responses in logs match coverage report error types?
Log analysis validates coverage report accuracy and reveals crawl behavior patterns not visible in Search Console.
Tools like Screaming Frog Log File Analyzer, Botify, or custom scripts process log files for SEO analysis.
Identifying Patterns Across Multiple Properties
Organizations managing multiple sites can identify patterns across properties:
Common issues: Do the same error types appear across sites? Shared infrastructure: Do sites on shared hosting show correlated problems? Template reuse: Do sites using similar templates have similar coverage profiles?
Cross-property analysis reveals systemic issues and enables standardized solutions.
Integrating Index Coverage Monitoring into Your SEO Workflow
Embed coverage monitoring into standard processes rather than treating it as a separate activity.
Building Coverage Checks into Site Launch Processes
Include coverage verification in site launch checklists:
Pre-launch:
- Verify robots.txt allows crawling of intended pages
- Confirm no unintended noindex tags
- Test sitemap validity and submission
- Check server response codes for key pages
Post-launch:
- Monitor coverage report for new site recognition
- Track indexation progress of key pages
- Investigate any errors appearing in reports
- Verify expected pages achieve Valid status
Document expected coverage outcomes and compare actual results against expectations.
Post-Migration Index Coverage Validation
Site migrations require intensive coverage monitoring:
Pre-migration baseline: Document current coverage metrics for comparison.
Migration monitoring: Check coverage daily during and after migration.
Redirect validation: Verify redirects function correctly and old URLs show appropriate status.
Indexation tracking: Monitor new URL indexation progress.
Error investigation: Promptly investigate any error spikes.
Migrations commonly cause temporary coverage disruptions. Distinguish expected transitional issues from problems requiring intervention.
Ongoing Monitoring Cadence and Reporting
Establish regular reporting rhythms:
Weekly: Quick coverage health check, error count review Monthly: Detailed coverage analysis, trend review, issue prioritization Quarterly: Comprehensive audit, strategy review, goal setting
Create standardized reports showing:
Current coverage metrics Trends versus previous periods Active issues and remediation status Upcoming risks or concerns
Share reports with stakeholders to maintain visibility and support for technical SEO work.
Escalation Protocols for Critical Coverage Issues
Define escalation procedures for serious coverage problems:
Severity levels:
- Critical: Major traffic-driving pages affected, immediate response required
- High: Significant page counts affected, response within 24 hours
- Medium: Limited impact, response within one week
- Low: Minor issues, address during routine maintenance
Escalation paths:
- Technical issues: Development team
- Content issues: Content team
- Infrastructure issues: Operations/hosting team
Response procedures:
- Acknowledge issue
- Diagnose root cause
- Implement fix
- Verify resolution
- Document for future prevention
Clear protocols ensure coverage issues receive appropriate attention based on business impact.
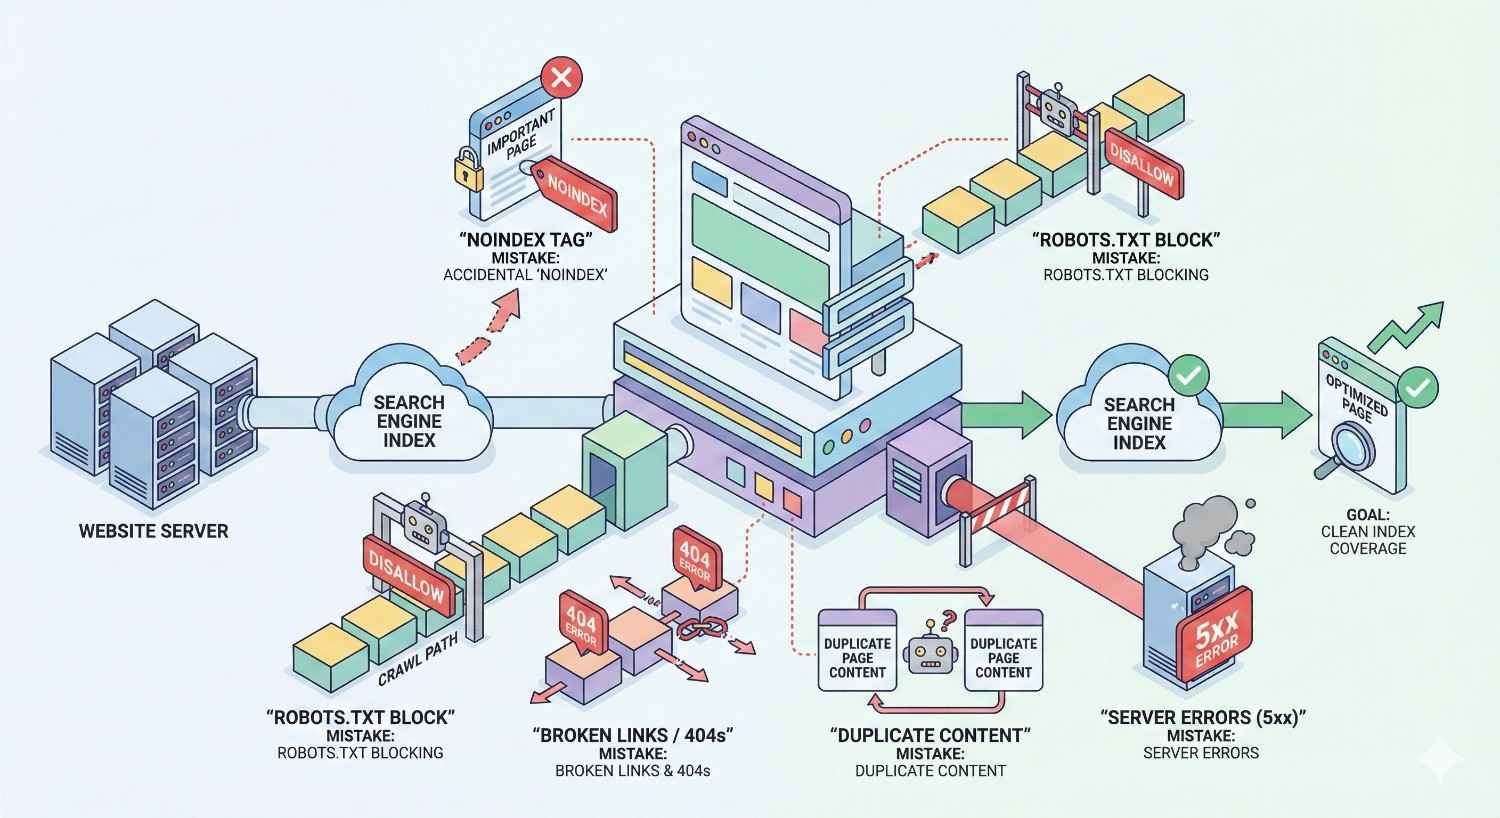
Common Index Coverage Mistakes to Avoid
Learn from frequent errors to prevent coverage problems.
Ignoring “Excluded” Status Pages
Many site owners focus exclusively on errors while ignoring excluded pages. This oversight misses important signals.
“Crawled – currently not indexed” pages represent content Google evaluated and rejected. If these include pages you want indexed, quality improvements are needed.
Duplicate content exclusions may indicate canonicalization problems or unintended content duplication.
Review excluded pages regularly, not just errors. Understand why Google excludes each page type and whether that matches your intentions.
Over-Requesting Indexing
Excessive indexing requests don’t accelerate indexation and may trigger rate limiting.
Request indexing only for:
Genuinely new, important content Pages with significant updates Pages where you’ve fixed previous errors
Don’t request indexing for:
Pages that are already indexed Minor content updates Large batches of pages (use sitemaps instead)
Trust natural crawling for routine indexation. Reserve manual requests for priority situations.
Misinterpreting Coverage Warnings
Warnings don’t always indicate problems. “Indexed, though blocked by robots.txt” might be intentional if you want the URL indexed based on external signals without exposing content.
Before “fixing” warnings, understand whether current behavior matches your intentions. Some warnings reflect legitimate configurations rather than mistakes.
Document intentional warning states so future team members don’t “fix” configurations that are working as designed.
Failing to Monitor After Technical Changes
Technical changes frequently cause coverage issues. Deployments, migrations, infrastructure changes, and CMS updates all risk introducing problems.
Establish monitoring protocols for technical changes:
Check coverage within 24-48 hours of significant changes Compare post-change metrics against pre-change baselines Investigate any unexpected variations
Early detection enables faster resolution before issues compound.
Tools and Resources for Index Coverage Management
Supplement Search Console with additional tools for comprehensive coverage management.
GSC API and Third-Party Integrations
The Search Console API enables custom integrations and automated workflows.
Popular integrations include:
Data Studio/Looker Studio: Visualize coverage data in custom dashboards SEO platforms: Integrate coverage data with broader SEO toolsets Custom scripts: Automate monitoring, alerting, and reporting
API documentation is available in Google’s developer resources. Most integrations require OAuth setup and respect API rate limits.
Screaming Frog and Crawling Tools
Desktop and cloud crawlers complement Search Console data:
Screaming Frog SEO Spider: Comprehensive site crawling with coverage-relevant data Sitebulb: Visual crawl analysis with indexability insights DeepCrawl/Lumar: Enterprise cloud crawling for large sites Botify: Enterprise platform combining crawling with log analysis
Crawlers reveal issues before they appear in Search Console and provide detailed technical diagnostics.
Log File Analyzers
Log file analysis tools process server logs for SEO insights:
Screaming Frog Log File Analyzer: Desktop tool for log analysis Botify: Integrated log analysis in enterprise platform Custom solutions: Scripts processing logs for specific analysis needs
Log analysis validates Search Console data and reveals crawl behavior patterns.
Monitoring and Alerting Platforms
Dedicated monitoring tools provide continuous coverage tracking:
ContentKing: Real-time SEO monitoring and alerting Little Warden: Automated SEO monitoring checks Custom solutions: Prometheus, Grafana, or similar tools configured for SEO metrics
These platforms catch issues faster than periodic manual reviews.
When to Get Professional Help with Index Coverage Issues
Some coverage problems require specialized expertise beyond routine maintenance.
Signs You Need Technical SEO Support
Consider professional help when:
Persistent errors: Issues remain unresolved despite troubleshooting attempts.
Complex architecture: Large sites with complicated URL structures, JavaScript rendering, or international configurations.
Migration planning: Upcoming migrations requiring careful coverage preservation.
Declining metrics: Unexplained drops in indexed page counts or traffic.
Resource constraints: Internal teams lack time or expertise for thorough analysis.
Professional support accelerates resolution and prevents costly mistakes.
What to Expect from Professional Index Coverage Audits
Comprehensive audits typically include:
Full coverage analysis: Review of all status types and affected URLs.
Root cause diagnosis: Investigation of underlying technical issues.
Prioritized recommendations: Actionable fixes ranked by impact and effort.
Implementation guidance: Technical specifications for development teams.
Monitoring setup: Systems for ongoing coverage tracking.
Audit deliverables should include both immediate fixes and long-term maintenance recommendations.
How We Help Businesses Resolve Complex Indexing Issues
White Label SEO Service provides comprehensive technical SEO support for businesses facing coverage challenges. Our team diagnoses complex indexing problems, implements solutions, and establishes monitoring systems that prevent future issues.
We work with businesses of all sizes, from startups launching new sites to enterprises managing millions of URLs. Our approach combines deep technical expertise with clear communication that helps stakeholders understand both problems and solutions.
Whether you need a one-time audit or ongoing technical SEO partnership, we deliver measurable improvements in index coverage and organic visibility.
Conclusion
Google Search Console Index Coverage reports provide essential visibility into how Google indexes your website. Understanding status types, diagnosing errors, and maintaining healthy coverage directly impacts your organic search performance.
Systematic monitoring, proactive maintenance, and prompt issue resolution keep your pages indexed and competitive. The investment in coverage management pays returns through sustained organic visibility and traffic growth.
We help businesses build sustainable organic growth through technical SEO excellence. Contact White Label SEO Service to discuss your index coverage challenges and discover how we can improve your search visibility.
Frequently Asked Questions
How often does Google update Index Coverage reports?
Google typically updates Index Coverage data every few days, though timing varies. Major changes may appear within 24-48 hours, while minor updates can take a week or more. Check the “Last updated” timestamp in your report for the most recent data refresh.
Why are my pages showing “Discovered – currently not indexed” for weeks?
Pages remain in “Discovered” status when Google knows about them but hasn’t crawled them yet. This often indicates crawl budget limitations or low crawl priority. Improve internal linking to these pages, ensure they’re in your sitemap, and verify no technical issues are blocking access.
Can I force Google to index a specific page immediately?
You can request indexing through the URL Inspection tool, which adds the page to Google’s priority crawl queue. However, Google doesn’t guarantee immediate indexing. The request accelerates crawling but doesn’t override Google’s quality evaluation for index inclusion.
What’s the difference between “Crawled – currently not indexed” and “Discovered – currently not indexed”?
“Discovered” means Google knows the URL exists but hasn’t crawled it yet. “Crawled” means Google fetched the page but chose not to index it after evaluation. The latter suggests content quality or uniqueness issues rather than crawl access problems.
How do I fix pages that keep returning to error status after I fix them?
Recurring errors often indicate underlying issues beyond the immediate symptom. Check for intermittent server problems, caching issues serving stale error responses, or deployment processes that reintroduce problems. Review server logs and deployment procedures to identify the root cause.
Should I be concerned about high numbers of excluded pages?
Not necessarily. Many excluded pages represent expected behavior: duplicates properly canonicalized, intentionally blocked pages, or alternate versions. Review excluded reasons to ensure important content isn’t incorrectly categorized, but don’t aim to eliminate all exclusions.
How does Index Coverage relate to my site’s crawl budget?
Coverage errors waste crawl budget on failed requests. High error counts mean Googlebot spends resources encountering problems rather than indexing valuable content. Fixing errors improves crawl efficiency, potentially accelerating indexation of new content on large sites with budget constraints.


