
A hacked website costs you traffic, revenue, and customer trust every hour it stays compromised. The average recovery takes 24-72 hours when you act fast with the right process. Delays compound damage exponentially.
Website security breaches affect businesses of all sizes. Whether you’re dealing with malware injections, SEO spam, or defacement attacks, the recovery process follows predictable steps that minimize downtime and protect your search rankings.
This guide covers everything from identifying the hack to cleaning malware, restoring functionality, removing blacklist warnings, and hardening security. You’ll have a clear action plan to recover your site and prevent future attacks.
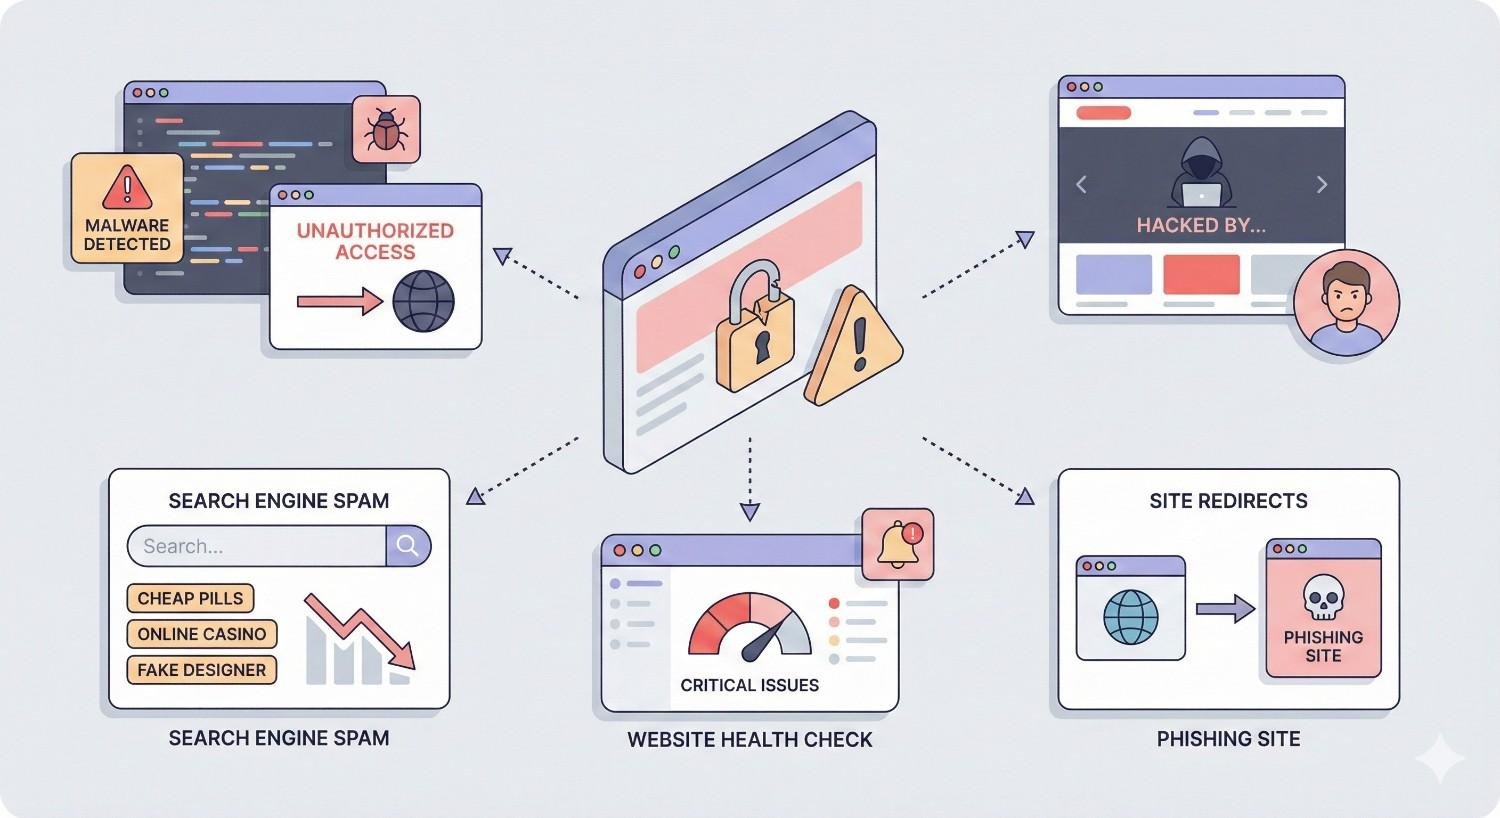
Signs Your Website Has Been Hacked
Detecting a hack early limits damage to your site, rankings, and reputation. Many website owners discover breaches weeks or months after the initial compromise. Knowing what to look for helps you respond faster.
Visible Indicators of a Compromised Website
The most obvious signs appear directly on your website’s frontend. Visitors might see unfamiliar content, strange pop-ups, or redirects to suspicious websites. Your homepage could display defacement messages or foreign language content you didn’t create.
Check for unauthorized advertisements, especially pharmaceutical or gambling promotions. Hackers frequently inject these to monetize compromised sites. Look for new pages you didn’t create, particularly in subdirectories like /wp-content/ or hidden folders.
Browser warnings represent another clear indicator. If Chrome, Firefox, or Safari displays “This site may harm your computer” messages, search engines have already flagged your site as dangerous.
Backend Warning Signs and Admin Panel Changes
Your admin area often reveals compromise before visitors notice problems. Watch for new administrator accounts you didn’t create. Hackers establish backdoor access through fake user accounts with elevated privileges.
File modification dates provide critical evidence. If core files show recent changes when you haven’t updated anything, investigate immediately. Pay attention to .htaccess files, wp-config.php, and index files across your installation.
Plugin and theme changes without your authorization signal trouble. Hackers install malicious plugins or modify existing ones to maintain access. Check your installed plugins list against what you actually use.
Database anomalies also indicate compromise. Unexpected tables, modified user records, or strange content in your posts table suggest SQL injection or direct database access.
Search Engine and Security Tool Alerts
Google Search Console delivers direct notifications about security issues. The Security Issues report shows detected malware, phishing content, or hacked content. Check this dashboard immediately if you suspect problems.
Search results themselves reveal hacks. Google your site using “site:yourdomain.com” and look for unfamiliar pages, Japanese characters, or pharmaceutical keywords in titles and descriptions. SEO spam hacks often create thousands of hidden pages targeting specific keywords.
Security scanning tools like Sucuri SiteCheck, VirusTotal, or your hosting provider’s malware scanner detect infections. Run multiple scans since different tools catch different threats. Google’s Safe Browsing diagnostic shows whether your site appears on their blocklist.
Performance and Traffic Anomalies
Sudden traffic drops in Google Analytics often indicate hacking. If organic traffic falls 50% or more without algorithm updates or technical changes, investigate security first. Hacked sites frequently get deindexed or filtered from search results.
Server resource spikes suggest malicious activity. Cryptocurrency mining scripts, spam email distribution, or DDoS participation consume abnormal CPU and bandwidth. Check your hosting control panel for resource usage patterns.
Slow page load times without explanation warrant investigation. Malicious scripts add processing overhead. If your site suddenly takes 10+ seconds to load when it previously loaded in 2-3 seconds, scan for injected code.
Email deliverability problems connect to hacking. If your domain gets blacklisted for spam, hackers may be using your server to send malicious emails. Check blacklist status at MXToolbox or similar services.
Immediate Actions to Take When Your Website Is Hacked
Speed matters when responding to a hack. Every hour your compromised site stays online risks further damage to visitors, your reputation, and search rankings. Follow these steps in order.
Step 1: Isolate and Take Your Site Offline
Remove public access immediately. This prevents visitors from encountering malware and stops hackers from causing additional damage. You have several options depending on your hosting setup.
Enable maintenance mode through your CMS if you can still access the admin panel. WordPress users can install a maintenance mode plugin or add a simple maintenance.php file. This displays a friendly message while blocking site access.
For more severe compromises, rename your main index file or use .htaccess rules to block all traffic. Add this to your .htaccess file:
Copy
Order deny,allow
Deny from all
Allow from YOUR.IP.ADDRESS
Replace YOUR.IP.ADDRESS with your actual IP to maintain your own access. Contact your hosting provider if you cannot access files directly. Most hosts can suspend your site temporarily while you investigate.
Step 2: Change All Passwords and Access Credentials
Assume all credentials are compromised. Change passwords for every account connected to your website. This includes CMS admin accounts, FTP/SFTP access, database users, hosting control panel logins, and SSH keys.
Generate strong, unique passwords using a password manager. Each password should be at least 16 characters with mixed case, numbers, and symbols. Never reuse passwords across different services.
Revoke all active sessions in your CMS. WordPress users should update security keys in wp-config.php to force all users to log in again. This invalidates any stolen session cookies.
Update API keys and third-party service credentials. Payment processors, email services, CDN providers, and analytics tools all need fresh credentials. Hackers often harvest these for later use or sale.
Step 3: Notify Your Hosting Provider
Contact your host immediately through their priority support channel. Explain that your site has been compromised and request their assistance. Quality hosting providers offer security support and may have additional tools to help.
Ask your host to check server logs for unauthorized access patterns. They can identify the initial entry point, compromised files, and timeline of the attack. This information guides your cleanup process.
Request a malware scan from your host’s security team. Many providers run server-level scans that catch infections your own tools might miss. They may also identify other compromised sites on shared hosting that could reinfect yours.
Inquire about backup availability. Your host may maintain backups you can restore from, even if you don’t have your own backup system in place.
Step 4: Document the Damage and Collect Evidence
Create a detailed record of everything you find. This documentation helps with cleanup, prevents missing infected files, and provides evidence if you need to report the incident or pursue legal action.
Screenshot visible symptoms including defaced pages, warning messages, and suspicious content. Save copies of modified files before cleaning them. Note timestamps, file paths, and the nature of each change.
Export server access logs covering at least 30 days before the suspected compromise date. These logs reveal how attackers gained access and what they did afterward. Look for unusual IP addresses, failed login attempts, and access to sensitive files.
Record your Google Search Console security issues report. Document any blacklist notifications from browsers or security services. This creates a baseline for measuring recovery progress.
Step 5: Assess the Type and Severity of the Attack
Understanding what happened shapes your recovery approach. Different attack types require different cleanup procedures. Misidentifying the attack leads to incomplete recovery and reinfection.
Malware injections embed malicious code in your files or database. These range from simple script injections to sophisticated backdoors. Look for encoded PHP, JavaScript redirects, or iframe injections.
SEO spam hacks create hidden pages or inject links to boost other sites’ rankings. Check for doorway pages, cloaked content, or link injections in your posts and comments.
Defacement attacks replace your content with the attacker’s message. These are often the easiest to clean but may mask deeper compromise. Always scan thoroughly even if the visible damage seems superficial.
Backdoor installations provide persistent access even after you clean visible infections. Hackers create hidden admin accounts, upload web shells, or modify core files to maintain control.
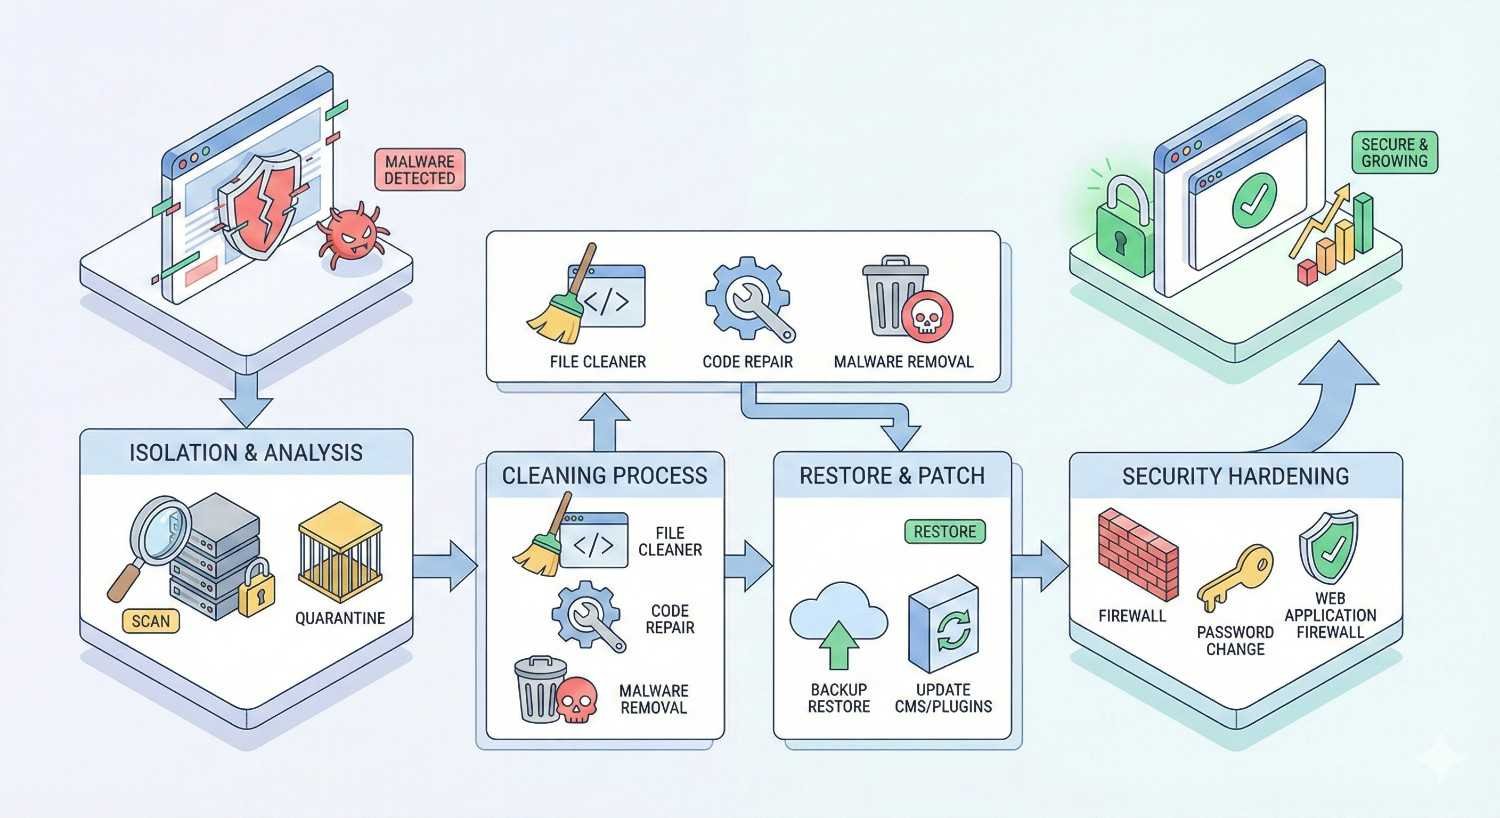
How to Clean and Remove Malware from Your Hacked Website
Thorough malware removal requires systematic scanning, identification, and cleaning. Rushing this process leaves infections behind, leading to reinfection within days or weeks.
Scanning Your Website for Malicious Code
Run multiple scanning tools to maximize detection coverage. No single scanner catches everything. Use a combination of server-side and remote scanning approaches.
Server-side scanners examine your actual files and database. Tools like Wordfence, Sucuri, or MalCare for WordPress provide deep scanning capabilities. For other platforms, use ClamAV or similar server-level antivirus tools.
Remote scanners check your site from the outside, detecting symptoms visible to visitors. Sucuri SiteCheck, VirusTotal, and Google Safe Browsing identify blacklisting, malware warnings, and suspicious behavior.
Manual file comparison catches what automated tools miss. Download a fresh copy of your CMS core files and compare them against your installation. Any differences in core files indicate tampering.
Check file modification dates across your entire installation. Sort files by date modified and investigate anything changed around the suspected compromise time. Pay special attention to PHP files, JavaScript, and configuration files.
Identifying Infected Files and Database Entries
Malware hides in predictable locations. Focus your investigation on high-risk areas first, then expand to comprehensive coverage.
Core CMS files rarely need modification. Any changes to WordPress core, Joomla core, or similar platform files almost certainly indicate infection. Replace these entirely with fresh downloads.
Theme and plugin files frequently harbor malware. Check functions.php, header.php, footer.php, and any files with generic names like class.php or cache.php. Hackers often create new files with innocent-sounding names.
Upload directories contain user-submitted content and represent common infection points. Scan wp-content/uploads or equivalent directories for PHP files, which should never exist in image upload folders.
Database infections require SQL queries to detect. Search your posts table for script tags, iframes, and encoded content. Check the options table for unfamiliar entries, especially those containing URLs or serialized PHP.
Look for these common malware signatures:
- Base64 encoded strings: eval(base64_decode(
- Obfuscated code: $_POST[‘x’]($_POST[‘y’])
- Hidden iframes: <iframe style=”display:none”
- External script loading: document.write(‘<script src=
Manual Malware Removal Process
Manual cleaning provides the most thorough results but requires technical skill. If you’re uncomfortable editing code, consider professional help or automated tools.
Start with core files. Download fresh copies of your CMS from the official source. Replace all core files completely rather than trying to clean them individually. This eliminates any modifications to system files.
Clean theme files by comparing against original versions. If you use a commercial theme, download a fresh copy from the vendor. For custom themes, review every PHP file for injected code, particularly at the beginning and end of files where hackers commonly insert malware.
Remove unfamiliar plugins entirely. Delete any plugins you don’t recognize or no longer use. For plugins you keep, delete and reinstall from official sources rather than cleaning infected versions.
Database cleaning requires careful SQL queries. Back up your database before making changes. Remove malicious content from posts, comments, and options tables. Update any modified user accounts and delete unauthorized admin users.
Check and clean .htaccess files in every directory. Hackers use .htaccess rules for redirects, cloaking, and blocking security tools. Compare against default .htaccess content for your platform.
Using Security Plugins and Automated Cleaning Tools
Automated tools speed up the cleaning process and catch infections you might miss manually. They work best as a complement to manual review, not a replacement.
WordPress security plugins like Wordfence, Sucuri Security, and MalCare offer one-click malware removal. These tools maintain databases of known malware signatures and can automatically clean common infections.
Sucuri’s website firewall and malware removal service provides professional-grade cleaning with ongoing protection. Their team handles complex infections that automated tools cannot resolve.
For non-WordPress sites, services like SiteLock and Comodo offer platform-agnostic malware scanning and removal. These integrate with most hosting providers and CMS platforms.
After automated cleaning, always verify results manually. Check that all malicious code is actually removed. Scan again with different tools to confirm clean status.
Restoring from Clean Backups
Backup restoration offers the fastest path to a clean site when you have verified clean backups available. This approach works best for severe infections or when manual cleaning proves too complex.
Identify your most recent clean backup. This must predate the infection, which may be weeks or months before you noticed symptoms. Check backup dates against your server logs to find when the compromise actually occurred.
Test backup integrity before restoring. Extract the backup to a staging environment and scan for malware. Infected backups restore the problem rather than solving it.
Restore files and database together. Partial restoration often fails because malware exists in both locations. A clean file system with an infected database, or vice versa, leads to immediate reinfection.
After restoration, immediately update all software and change all credentials. The vulnerability that allowed the original hack still exists in your restored backup. Patch it before going live.
Restoring Your Website After a Hack
Once malware is removed, systematic restoration ensures your site functions correctly and remains secure. Rushing this phase leads to broken functionality or missed security gaps.
Evaluating Backup Integrity and Restoration Points
Not all backups are created equal. Evaluate your options carefully before committing to a restoration approach.
Check backup completeness. A full backup includes files, database, and configuration. Partial backups may restore your site to a broken state requiring additional work.
Verify backup dates against your infection timeline. If your earliest clean backup is six months old, you’ll lose six months of content and changes. Weigh this against the effort of manual cleaning.
Test backups in isolation before production restoration. Create a staging environment and restore there first. Verify functionality, check for malware, and confirm all content appears correctly.
Consider hybrid approaches. You might restore core files from backup while preserving your current database content after cleaning. This balances security with content preservation.
Step-by-Step Website Restoration Process
Follow this sequence for reliable restoration:
- Prepare your environment. Ensure your hosting account is clean. Some hosts can provision a fresh environment, eliminating any server-level compromise.
- Upload clean files. Transfer your verified clean backup or freshly downloaded CMS files. Use SFTP rather than FTP for secure transfer.
- Restore or connect your database. Import your clean database backup or connect to your cleaned existing database. Verify database credentials in your configuration file.
- Update configuration. Ensure database connection settings, file paths, and site URLs are correct for your production environment.
- Reset all credentials. Generate new passwords, API keys, and security salts. Update these in your configuration and connected services.
- Install security measures. Add security plugins, configure firewalls, and implement monitoring before going live.
- Test thoroughly. Check all site functionality before removing maintenance mode.
Rebuilding Compromised Files and Databases
When backup restoration isn’t viable, rebuild compromised components systematically.
Reinstall your CMS from scratch using official downloads. This guarantees clean core files without any modifications. Configure your fresh installation to connect to your existing database.
Rebuild themes by starting with original theme files and reapplying customizations. Document your changes as you make them for future reference. Avoid copying code from your compromised installation.
Reinstall plugins from official repositories. Configure each plugin fresh rather than importing old settings, which might contain malicious data.
Clean your database using targeted queries. Remove spam content, unauthorized users, and malicious options. Verify that serialized data in options tables hasn’t been tampered with.
Rebuild user accounts with fresh credentials. Delete all existing users and create new accounts. This eliminates any backdoor accounts hackers created.
Testing Functionality Post-Restoration
Comprehensive testing catches problems before visitors encounter them. Work through this checklist systematically.
Frontend testing:
- Homepage loads correctly
- All pages and posts display properly
- Navigation menus function
- Forms submit successfully
- Search works
- Media files display
- No redirect loops or errors
Backend testing:
- Admin login works
- All admin pages load
- Content editing functions
- Plugin settings accessible
- User management works
- Media uploads succeed
Integration testing:
- Payment processing functions
- Email delivery works
- Third-party APIs connect
- Analytics tracking fires
- Social sharing works
Security testing:
- Run malware scans again
- Check for remaining vulnerabilities
- Verify SSL certificate
- Test login security
- Confirm backup systems work
Removing Security Warnings and Blacklist Flags
A clean site still suffers if browsers warn visitors away. Removing blacklist flags requires demonstrating to search engines and security services that your site is safe.
Understanding Google Safe Browsing Warnings
Google Safe Browsing protects billions of users by warning them about dangerous sites. When your site triggers these warnings, traffic drops dramatically as visitors see scary red warning screens.
Google flags sites for several reasons: malware distribution, phishing content, unwanted software, or social engineering. Each category has specific criteria and removal processes.
Warnings appear in Chrome, Firefox, Safari, and search results. The “This site may harm your computer” message in search results devastates click-through rates. Browser interstitials block access entirely until users click through multiple warnings.
Google’s systems continuously scan the web. Once flagged, your site enters a review queue. Removal requires cleaning the infection AND requesting review. Simply cleaning isn’t enough.
Submitting a Reconsideration Request to Google
Google Search Console provides the official channel for security issue resolution. You must verify site ownership before requesting review.
Navigate to Security & Manual Actions > Security Issues in Search Console. This report shows exactly what Google detected and where. Address every listed issue before requesting review.
Clean all identified problems thoroughly. Google’s review checks whether issues are actually resolved. Submitting requests for still-infected sites delays resolution and may result in longer review times for future requests.
Click “Request Review” after cleaning. Provide a detailed explanation of what happened, what you cleaned, and what security measures you implemented. Specific, technical descriptions demonstrate competence and thoroughness.
Review typically takes 1-3 days but can extend to several weeks for complex cases. Monitor Search Console for status updates. If rejected, address the stated reasons and resubmit.
Removing Malware Warnings from Other Browsers
While Google Safe Browsing powers most browser warnings, other services maintain independent blocklists.
Microsoft SmartScreen protects Edge and Internet Explorer users. Submit your site for review through the Microsoft Security Intelligence portal. Provide evidence of cleanup and security improvements.
Norton Safe Web, McAfee SiteAdvisor, and similar security tools maintain their own databases. Visit each service’s site review page to check your status and request reevaluation.
Yandex and Baidu matter for international traffic. These search engines have their own webmaster tools and security review processes. Submit through their respective platforms if you serve those markets.
Delisting from Spam and Malware Blacklists
Dozens of blacklists track malicious sites. Email deliverability, security tool warnings, and even some hosting providers reference these lists.
Check your status across multiple blacklists using MXToolbox Blacklist Check or similar aggregate tools. This reveals which lists include your domain or IP address.
Each blacklist has its own delisting process. Some remove entries automatically after detecting the site is clean. Others require manual requests through their websites.
Common blacklists to check:
- Spamhaus
- SURBL
- Barracuda
- SpamCop
- SORBS
- CBL
Document your delisting requests and follow up if status doesn’t change within stated timeframes. Some lists take weeks to process requests.
Securing Your Website to Prevent Future Hacks
Recovery without improved security guarantees future incidents. Implement comprehensive protections to prevent the same attack from succeeding again.
Updating CMS, Plugins, and Themes
Outdated software represents the most common attack vector. Sucuri’s research consistently shows that the majority of hacked sites run outdated CMS versions or plugins.
Update your CMS core immediately after recovery. WordPress, Joomla, Drupal, and other platforms release security patches regularly. Enable automatic updates for minor releases when possible.
Audit all plugins and themes. Remove anything you don’t actively use. Each installed component represents potential vulnerability. Fewer plugins mean smaller attack surface.
Update remaining plugins and themes to current versions. Check that updates come from official sources. Nulled or pirated themes frequently contain built-in backdoors.
Establish an update schedule. Check for updates weekly at minimum. Subscribe to security mailing lists for your platform to receive vulnerability notifications.
Implementing Strong Password Policies and 2FA
Weak credentials enable brute force attacks and credential stuffing. Strengthen authentication across all access points.
Require passwords of at least 16 characters with complexity requirements. Use a password manager to generate and store unique passwords for every account.
Implement two-factor authentication for all admin accounts. TOTP apps like Google Authenticator or Authy provide strong second factors. SMS-based 2FA is better than nothing but vulnerable to SIM swapping.
Limit login attempts to prevent brute force attacks. After 5-10 failed attempts, lock the account temporarily or require CAPTCHA verification.
Change default usernames. “Admin” accounts are targeted first. Use unique usernames that aren’t publicly visible on your site.
Installing Web Application Firewalls (WAF)
WAFs filter malicious traffic before it reaches your site. They block known attack patterns, bot traffic, and exploitation attempts.
Cloud-based WAFs like Cloudflare, Sucuri, and Akamai sit between visitors and your server. They filter traffic at the network edge, stopping attacks before they consume your server resources.
Plugin-based WAFs like Wordfence run on your server. They provide application-level filtering and can block attacks that cloud WAFs miss. The tradeoff is increased server load.
Configure WAF rules appropriately for your site. Overly aggressive rules block legitimate users. Start with moderate settings and tighten based on observed attack patterns.
Enable virtual patching when available. WAFs can block exploitation of known vulnerabilities even before you apply software updates. This provides protection during the window between vulnerability disclosure and patching.
Regular Security Scanning and Monitoring
Continuous monitoring catches new infections before they cause significant damage. Automated scanning provides consistent coverage without manual effort.
Schedule daily malware scans using your security plugin or external service. Configure alerts for any detected issues. Immediate notification enables rapid response.
Monitor file integrity. Tools that track file changes alert you when core files are modified unexpectedly. This catches infections that evade signature-based detection.
Set up uptime monitoring to detect defacement or site takedowns. Services like UptimeRobot or Pingdom alert you within minutes when your site goes down.
Review security logs regularly. Look for patterns of failed login attempts, suspicious file access, or unusual traffic spikes. These often precede successful attacks.
File Permission and Access Control Best Practices
Proper permissions limit damage when attackers gain partial access. Restrictive settings prevent malware from spreading or modifying critical files.
Set directory permissions to 755 and file permissions to 644 as baseline. Configuration files containing credentials should be 600 or 640, readable only by the owner.
Never use 777 permissions. World-writable files and directories invite exploitation. If a plugin requires 777, find an alternative or implement additional protections.
Disable file editing through your CMS admin panel. WordPress users should add define(‘DISALLOW_FILE_EDIT’, true); to wp-config.php. This prevents attackers with admin access from modifying theme and plugin files directly.
Restrict PHP execution in upload directories. Add .htaccess rules to prevent uploaded files from executing as scripts. This blocks a common attack vector.
SSL Certificates and HTTPS Implementation
HTTPS encrypts traffic between visitors and your server. This prevents interception of login credentials and protects user data.
Install an SSL certificate if you haven’t already. Let’s Encrypt provides free certificates. Most hosting providers offer one-click SSL installation.
Force HTTPS for all traffic. Redirect HTTP requests to HTTPS using server configuration or .htaccess rules. Update internal links to use HTTPS.
Enable HSTS (HTTP Strict Transport Security) to prevent downgrade attacks. This header tells browsers to always use HTTPS for your domain.
Keep certificates current. Expired certificates trigger browser warnings that damage trust. Set calendar reminders or use auto-renewal services.
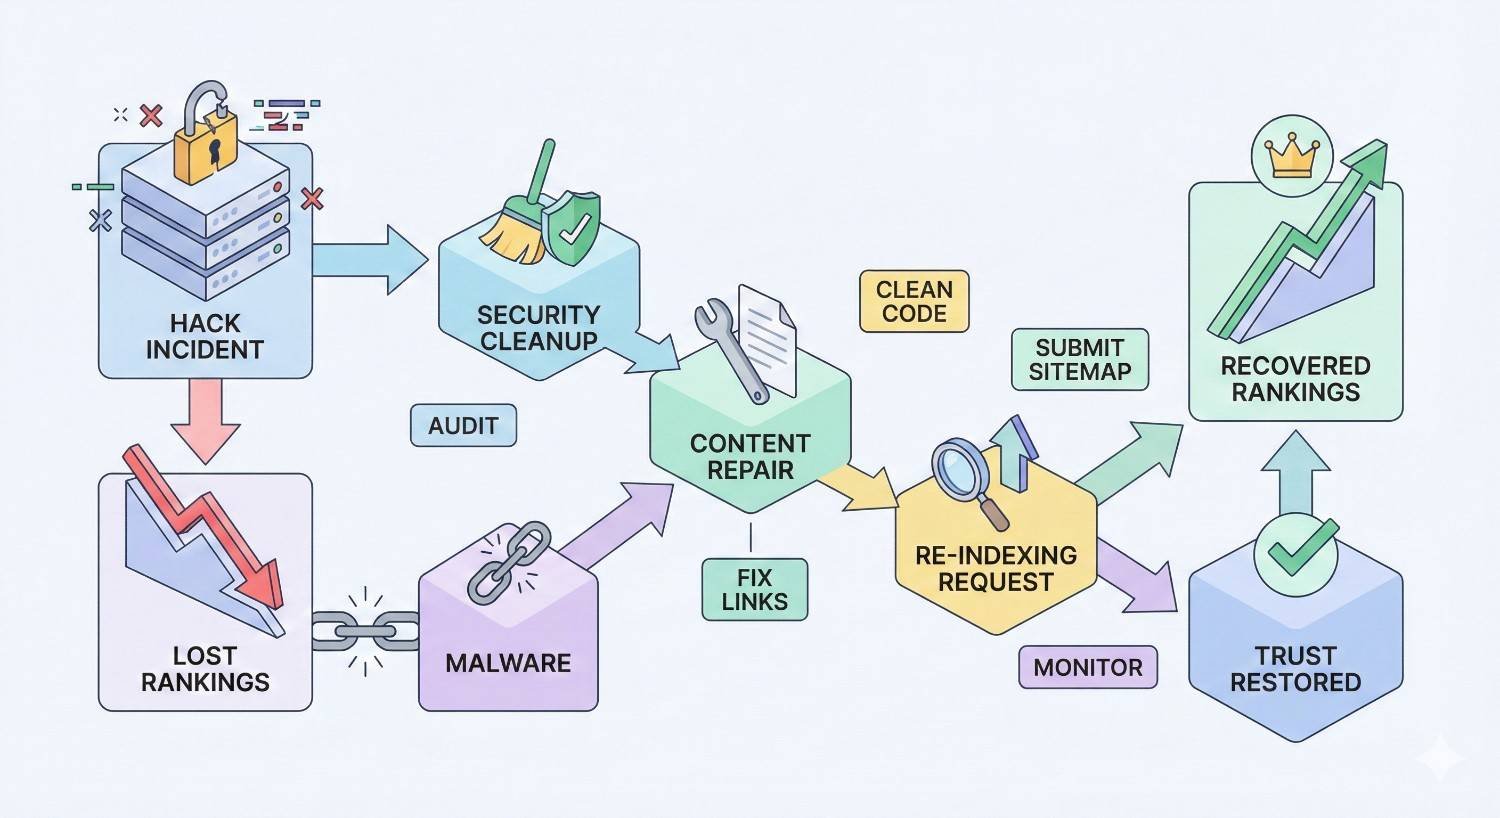
Recovering Lost SEO Rankings After a Website Hack
Security recovery is only half the battle. Hacks devastate search rankings, and rebuilding organic visibility requires deliberate effort.
How Hacks Impact Search Engine Rankings
Google penalizes hacked sites to protect searchers. The impact varies based on hack severity, duration, and type.
Direct penalties occur when Google detects malware or spam. Your site may be removed from search results entirely or flagged with warnings that destroy click-through rates.
Indirect damage accumulates during downtime. While your site is offline or blocked, you lose ranking signals. Competitors gain ground. Backlinks may be removed by webmasters who notice your site is compromised.
SEO spam hacks create particular problems. Thousands of spammy pages dilute your site’s topical authority. Even after removal, Google may take months to fully recrawl and reindex your cleaned site.
User behavior signals suffer. Visitors who encounter malware warnings bounce immediately. This negative engagement data can persist in Google’s systems even after you’re clean.
Reindexing Your Cleaned Website
Prompt reindexing accelerates ranking recovery. Don’t wait for Google to discover your cleaned site naturally.
Submit your sitemap in Google Search Console. This signals that your site has changed and encourages fresh crawling. Submit immediately after confirming your site is clean.
Use the URL Inspection tool to request indexing of key pages. Prioritize your homepage, main category pages, and highest-traffic content. Google limits how many URLs you can submit daily, so focus on what matters most.
Check crawl stats in Search Console. Monitor for crawl errors that might prevent Google from accessing your cleaned content. Fix any issues that appear.
Remove spammy URLs from your index. If the hack created thousands of spam pages, submit removal requests for those URLs. Use the Removals tool in Search Console for urgent cases.
Rebuilding Lost Backlinks and Authority
Hacks often cost you backlinks. Webmasters remove links to compromised sites, and some never restore them even after you’re clean.
Audit your backlink profile using Ahrefs, Semrush, or similar tools. Compare current backlinks against historical data to identify losses. Reach out to site owners who removed links, explaining that your site is now secure.
Disavow toxic backlinks the hack may have created. SEO spam hacks often build spammy links to your site. These can trigger algorithmic penalties. Use Google’s Disavow Tool to distance yourself from these links.
Rebuild authority through fresh link building. Create valuable content that earns natural links. Pursue guest posting, digital PR, and other legitimate link acquisition strategies.
Monitor brand mentions. Set up Google Alerts for your brand name. When people mention your hack or recovery, engage constructively. Positive coverage of your recovery can generate new links.
Timeline for SEO Recovery Post-Hack
Recovery timelines vary based on multiple factors. Set realistic expectations while working aggressively toward restoration.
Immediate (1-7 days): Security warnings removed, site reindexed, crawling resumed. Rankings may still be suppressed.
Short-term (2-8 weeks): Rankings begin recovering for branded terms and low-competition keywords. Traffic starts returning.
Medium-term (2-6 months): Competitive rankings recover as Google rebuilds trust signals. Traffic approaches pre-hack levels.
Long-term (6-12 months): Full recovery for most sites. Highly competitive terms may take longer. Some authority loss may be permanent.
Factors affecting timeline:
- Hack duration before detection
- Severity and type of compromise
- Speed and thoroughness of cleanup
- Pre-hack domain authority
- Ongoing SEO efforts during recovery
Understanding Common Types of Website Hacks
Knowing attack types helps you identify infections and implement targeted defenses. Each hack type has characteristic signatures and cleanup requirements.
Malware Injections and Backdoors
Malware injections insert malicious code into your existing files. Attackers modify PHP, JavaScript, or HTML to execute their payloads when pages load.
Common injection locations include theme headers and footers, plugin files, and database content. The injected code often appears obfuscated using base64 encoding or character manipulation to evade detection.
Backdoors provide persistent access independent of your credentials. Web shells like c99 or r57 give attackers full server control through a browser interface. These often hide in innocuous-looking files with names like class-wp.php or cache.php.
Cleaning requires finding and removing all injected code AND all backdoors. Missing even one backdoor means attackers can reinfect your site within hours.
Pharma and SEO Spam Hacks
Pharma hacks inject pharmaceutical keywords and links into your site. Attackers exploit your domain authority to rank their spam content for terms like “buy viagra” or “cheap cialis.”
These hacks often use cloaking. Your site appears normal to regular visitors but shows spam content to search engine crawlers. Check your site using Google’s “Fetch as Google” tool to see what Googlebot sees.
SEO spam creates doorway pages targeting various keywords. Thousands of auto-generated pages may appear in subdirectories. These pages link to attacker-controlled sites, passing your authority to their properties.
Japanese keyword hacks represent a specific variant creating pages in Japanese characters. These target Japanese search queries and can generate massive numbers of indexed spam pages.
Defacement Attacks
Defacement replaces your content with the attacker’s message. These attacks are often politically motivated or serve as bragging rights for hackers.
Visible defacement is obvious but may mask deeper compromise. Attackers who can modify your homepage likely have broader access. Always perform full security audits after defacement, not just content restoration.
Some defacements include malware distribution. The replacement page may attempt to install malware on visitor devices. Take your site offline immediately upon discovering defacement.
Brute Force and Credential Stuffing
Brute force attacks try password combinations until finding valid credentials. Automated tools can attempt thousands of passwords per minute against unprotected login pages.
Credential stuffing uses leaked username/password combinations from other breaches. If you reuse passwords, attackers can access your site using credentials stolen elsewhere.
These attacks succeed against weak passwords and unprotected login pages. Implement rate limiting, CAPTCHA, and two-factor authentication to defend against them.
SQL Injection and Cross-Site Scripting (XSS)
SQL injection exploits vulnerable database queries. Attackers insert malicious SQL commands through form fields, URL parameters, or cookies. Successful injection can read, modify, or delete database content.
XSS attacks inject malicious scripts that execute in visitors’ browsers. Stored XSS persists in your database, affecting all users who view the infected content. Reflected XSS requires victims to click malicious links.
Both vulnerabilities result from improper input validation. Keep software updated, use parameterized queries, and sanitize all user input to prevent these attacks.
When to Hire a Professional Website Security Service
DIY recovery works for straightforward infections. Complex compromises, limited technical skills, or business-critical sites often justify professional help.
Signs You Need Expert Help
Consider professional services when:
Technical complexity exceeds your skills. Rootkit infections, server-level compromise, or sophisticated backdoors require advanced expertise. If you’re not comfortable with command-line tools and code review, professionals work faster and more thoroughly.
Multiple cleanup attempts have failed. Reinfection within days or weeks indicates missed backdoors or unpatched vulnerabilities. Professionals bring fresh perspectives and comprehensive methodologies.
Business impact is severe. Revenue loss during extended downtime may exceed professional service costs. Calculate your hourly cost of downtime against service fees.
Legal or compliance requirements apply. Breaches involving customer data may require forensic investigation and documented remediation. Professionals provide reports suitable for regulatory compliance.
You lack time for thorough cleanup. Proper recovery takes hours or days of focused work. If you can’t dedicate this time, professionals handle it while you run your business.
What Professional Recovery Services Include
Quality security services provide comprehensive recovery:
Malware removal covers all infected files and database entries. Professionals use advanced scanning tools and manual review to ensure complete cleanup.
Vulnerability assessment identifies how attackers gained access. Understanding the entry point prevents reinfection through the same vector.
Security hardening implements protections against future attacks. This includes software updates, configuration changes, and security tool installation.
Blacklist removal handles communications with Google, browsers, and other services. Professionals know the processes and can expedite review.
Monitoring setup provides ongoing protection. Many services include months of monitoring to catch any reinfection attempts.
Documentation records what happened, what was cleaned, and what was implemented. This supports compliance requirements and future reference.
Cost Considerations for Hacked Website Recovery
Professional recovery costs vary based on infection severity and service level.
Basic cleanup services range from $150-500 for straightforward malware removal. These typically include scanning, cleaning, and basic hardening.
Comprehensive recovery costs $500-1,500 for complex infections requiring extensive manual work, database cleaning, and thorough hardening.
Emergency services with rapid response times command premium pricing, often $1,000-3,000 or more for same-day resolution.
Ongoing protection plans bundle recovery with monitoring and future cleanups. Monthly costs range from $10-300 depending on features and site size.
Compare costs against:
- Your hourly rate for DIY time
- Revenue lost during extended downtime
- Potential customer loss from prolonged security warnings
- Risk of incomplete cleanup leading to reinfection
Choosing the Right Security Partner
Evaluate potential providers carefully:
Reputation and track record matter most. Look for established companies with verifiable client testimonials. Check reviews on independent platforms, not just their website.
Specialization in your platform improves outcomes. WordPress security specialists understand WordPress-specific vulnerabilities better than generalists.
Clear scope and pricing prevent surprises. Get written quotes detailing exactly what’s included. Avoid providers who can’t estimate costs without extensive paid assessment.
Response time guarantees matter for urgent situations. Understand their SLA for initial response and typical resolution timeframes.
Ongoing support options provide value beyond initial cleanup. Providers offering monitoring and maintenance help prevent future incidents.
Preventing Data Loss and Customer Impact During Recovery
Hacks affect more than your website. Customer data, business operations, and legal obligations require attention during recovery.
Communicating with Customers About the Breach
Transparency builds trust even in difficult situations. How you communicate matters as much as what you say.
Assess what data was potentially exposed. Customer names, emails, passwords, payment information, and personal details each carry different implications. Your communication should reflect actual risk.
Notify affected customers promptly. Delays damage trust and may violate legal requirements. Explain what happened, what data was involved, and what you’re doing about it.
Provide actionable guidance. If passwords were exposed, tell customers to change them. If payment data was compromised, explain how to monitor for fraud. Give people concrete steps to protect themselves.
Maintain ongoing communication. Update customers as you learn more and as recovery progresses. Silence after initial notification suggests you’re not taking the situation seriously.
Protecting Customer Data and Privacy
Data protection obligations continue during and after recovery.
Secure any exposed data immediately. If customer databases were accessed, assume the data is compromised. You cannot un-expose data, but you can prevent further access.
Reset customer passwords if credential data was exposed. Force password changes on next login. Notify customers why this is happening.
Review what data you actually need to store. The breach may reveal you’re keeping unnecessary data. Minimize data retention to reduce future risk.
Implement additional protections for sensitive data. Encryption at rest, access logging, and data segmentation limit damage from future incidents.
Legal and Compliance Considerations
Data breaches trigger legal obligations depending on your location and customer base.
GDPR requires notification to supervisory authorities within 72 hours for breaches affecting EU residents’ personal data. Customer notification is required when breach poses high risk to individuals.
CCPA and state privacy laws impose various notification requirements for California and other US state residents. Requirements vary by state and data type.
PCI DSS compliance requires specific incident response procedures for payment card data breaches. Failure to comply can result in fines and loss of card processing ability.
Industry regulations like HIPAA for healthcare data impose additional requirements. Understand which regulations apply to your business.
Consult legal counsel for significant breaches. The cost of proper legal guidance is far less than penalties for mishandled breach response.
Maintaining Business Continuity During Downtime
Extended downtime threatens business survival. Plan for continuity while your main site recovers.
Communicate through alternative channels. Use social media, email lists, and phone to reach customers. Explain the situation and provide alternative ways to do business.
Set up temporary solutions. A simple landing page with contact information and status updates maintains some web presence. Third-party platforms can handle orders temporarily.
Prioritize critical functions. Identify what absolutely must work and focus recovery efforts there first. Full restoration can follow once essential operations resume.
Document business impact. Track lost revenue, additional costs, and customer impact. This information supports insurance claims and informs future security investment decisions.
Long-Term Website Security Strategy and Monitoring
Recovery is a beginning, not an end. Sustainable security requires ongoing attention and systematic processes.
Establishing Regular Backup Schedules
Backups are your ultimate safety net. Proper backup strategy makes future incidents recoverable rather than catastrophic.
Frequency should match your content change rate. Daily backups suit active sites. Weekly may suffice for static content. Real-time backup solutions protect sites with constant updates.
Retention determines how far back you can restore. Keep at least 30 days of backups. Longer retention helps when infections go undetected for extended periods.
Storage must be separate from your web server. Backups on the same server get compromised along with your site. Use cloud storage, remote servers, or offline media.
Testing confirms backups actually work. Periodically restore to a test environment. Untested backups provide false confidence.
Automation ensures consistency. Manual backup processes get forgotten. Automated systems run reliably without human intervention.
Continuous Security Monitoring and Threat Detection
Proactive monitoring catches problems before they escalate.
File integrity monitoring alerts you when files change unexpectedly. Any modification to core files warrants immediate investigation.
Login monitoring tracks authentication attempts. Patterns of failed logins indicate brute force attacks. Successful logins from unusual locations suggest compromised credentials.
Traffic analysis reveals attack patterns. Sudden spikes, unusual geographic sources, or suspicious request patterns may indicate ongoing attacks.
Vulnerability scanning identifies weaknesses before attackers exploit them. Regular scans catch outdated software, misconfigurations, and known vulnerabilities.
Uptime monitoring detects outages immediately. Whether from attacks or other causes, knowing your site is down enables rapid response.
Security Audits and Penetration Testing
Periodic professional assessment finds weaknesses internal monitoring misses.
Security audits review your overall security posture. Auditors examine configurations, policies, and practices to identify gaps.
Penetration testing simulates real attacks. Ethical hackers attempt to breach your defenses using the same techniques as malicious actors. This reveals vulnerabilities that theoretical analysis misses.
Frequency depends on your risk profile. Annual testing suits most small businesses. High-value targets or regulated industries may require quarterly assessment.
Scope should cover your entire attack surface. Web applications, server configurations, network security, and human factors all warrant examination.
Remediation must follow assessment. Testing without fixing identified issues wastes money. Budget for both assessment and remediation.
Employee Training and Access Management
Human factors cause many security incidents. Training and access controls reduce human-related risk.
Security awareness training helps staff recognize threats. Phishing, social engineering, and unsafe practices enable many attacks. Regular training keeps security top of mind.
Access principles should follow least privilege. Users should have only the access they need for their roles. Excessive permissions increase damage potential when accounts are compromised.
Account management requires ongoing attention. Remove access promptly when employees leave. Review permissions periodically to catch privilege creep.
Password policies must be enforced consistently. Require strong passwords and regular changes. Provide password managers to make compliance practical.
Incident reporting should be encouraged. Staff who notice suspicious activity should report it without fear of blame. Early detection depends on people speaking up.
Incident Response Planning
Preparation enables effective response when incidents occur.
Document your response plan before you need it. Written procedures ensure consistent, thorough response even under pressure.
Define roles and responsibilities. Who makes decisions? Who communicates externally? Who performs technical work? Clear assignments prevent confusion.
Establish communication channels. How will the team coordinate? How will you reach customers and stakeholders? Plan these before crisis hits.
Maintain contact lists. Security vendors, hosting providers, legal counsel, and key stakeholders should be reachable quickly. Keep contact information current.
Practice your response. Tabletop exercises walk through scenarios without actual incidents. Practice reveals gaps in your plan before real emergencies expose them.
Review and update after incidents and periodically otherwise. Lessons learned should improve future response. Changing circumstances require plan updates.
Conclusion
Hacked website recovery demands swift action, thorough cleaning, and systematic security improvements. The process spans malware removal, site restoration, blacklist delisting, and ranking recovery. Each phase builds on the previous one.
Your website represents significant business value. Protecting that investment requires ongoing vigilance, not just incident response. Regular updates, strong authentication, continuous monitoring, and tested backups form the foundation of sustainable security.
We help businesses recover from security incidents and build lasting protection. White Label SEO Service provides comprehensive support from emergency response through long-term security strategy. Contact us to discuss your website security needs.
Frequently Asked Questions
How long does it take to recover a hacked website?
Basic recovery takes 24-72 hours for straightforward infections with available clean backups. Complex compromises requiring manual malware removal and extensive hardening may take 1-2 weeks. SEO ranking recovery extends 2-6 months depending on hack severity and duration.
Can I recover my hacked website myself or do I need professional help?
DIY recovery works for simple infections if you’re comfortable with file management, database queries, and security concepts. Professional help makes sense for complex backdoors, repeated reinfection, server-level compromise, or when business impact justifies faster resolution.
Will my SEO rankings recover after a website hack?
Rankings typically recover within 2-6 months after thorough cleanup and blacklist removal. The timeline depends on hack duration, severity, and your ongoing SEO efforts. Some competitive rankings may take longer, and minor permanent authority loss is possible for severe incidents.
How do I know if my website backup is clean and safe to restore?
Scan backup files with multiple malware detection tools before restoration. Compare backup dates against your infection timeline to ensure the backup predates the compromise. Test restoration in an isolated staging environment and verify functionality before using in production.
What should I do if Google shows a security warning for my website?
Clean all malware and security issues identified in Google Search Console. Verify your site is completely clean using multiple scanning tools. Submit a reconsideration request through Search Console with detailed explanation of your cleanup actions. Review typically completes within 1-3 days.
How much does professional hacked website recovery cost?
Basic cleanup services range from $150-500. Comprehensive recovery for complex infections costs $500-1,500. Emergency same-day services may exceed $1,000-3,000. Ongoing protection plans with monitoring and future cleanup coverage run $10-300 monthly.
How can I prevent my website from being hacked again?
Keep all software updated including CMS, plugins, and themes. Implement strong passwords and two-factor authentication. Install a web application firewall. Run regular security scans and maintain tested backups. Limit user permissions and remove unused plugins. Consider ongoing professional monitoring for high-value sites.


